Navtiro Help

How to use the truck navigator: step by step, with screenshots.

Main screen

What the buttons on the map do when there is no route. During navigation some of them hide and others appear — see the “First route” section.

All buttons

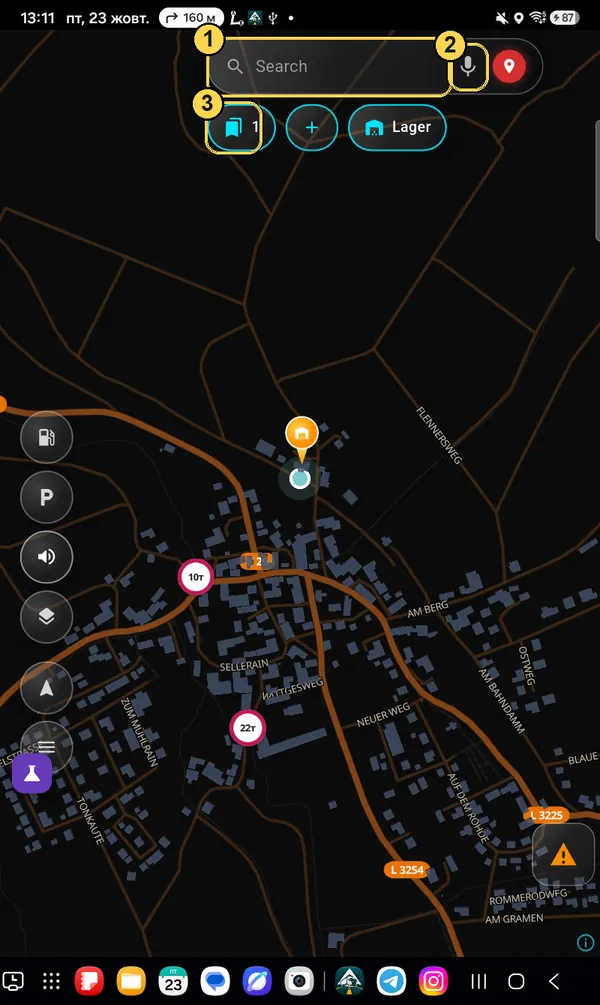
What is where

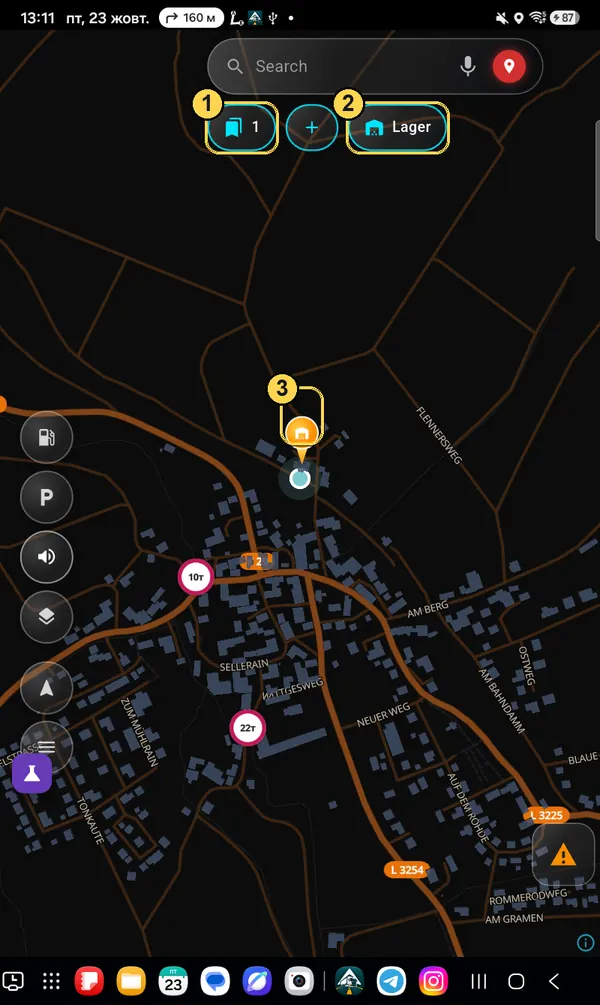
  1. 1Search — address, city, warehouse, coordinates.
  2. 2Microphone — say the address by voice.
  3. 3Red pin — also search: where we are going.
  4. 4My places — list of saved addresses (the number shows how many).
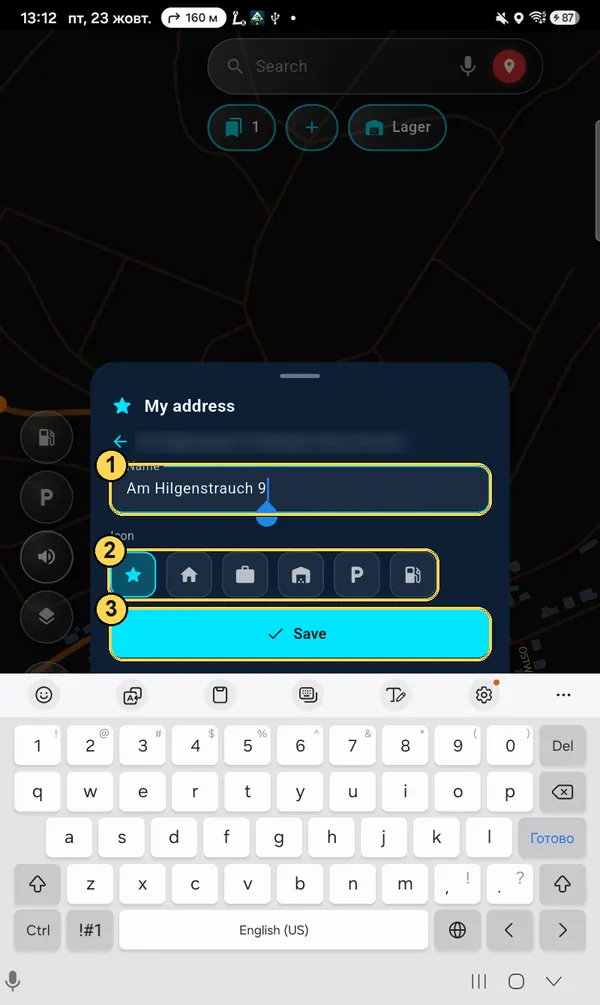
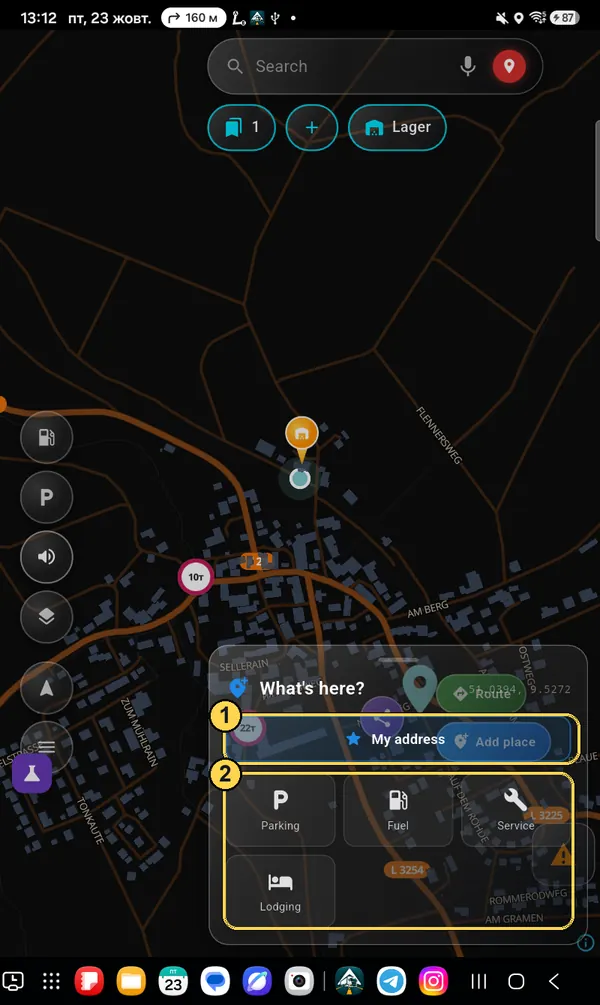
  5. 5“+” — save a new address.
  6. 6Saved place — tap: show it and build a route; hold: change it.
  7. 7Fuel — show or hide on the map.
  8. 8Parking — show or hide.
  9. 9Sound — turn voice prompts on / off.
  10. 10Map type — dark, light, satellite, buildings (see below).
  11. 11My position — bring the map back to your truck. While driving, a second tap shows the whole route that is left.
  12. 12Menu — profile, settings, offline maps, subscription, support. A red dot means a new version or a reply from support.
  13. 13Triangle — report a road event: jam, roadworks, police, closed road.
  14. 14Restriction signs for your truck: weight, height, truck ban. Only the ones that apply to your profile are shown.
  15. 15Your saved place on the map (here — a warehouse).
You can move buttons and make them bigger: Menu → Settings → Appearance → “Customize screen layout”. Service, lodging, compass and the “+/−” zoom are turned on in Settings → “What to show on the map”.
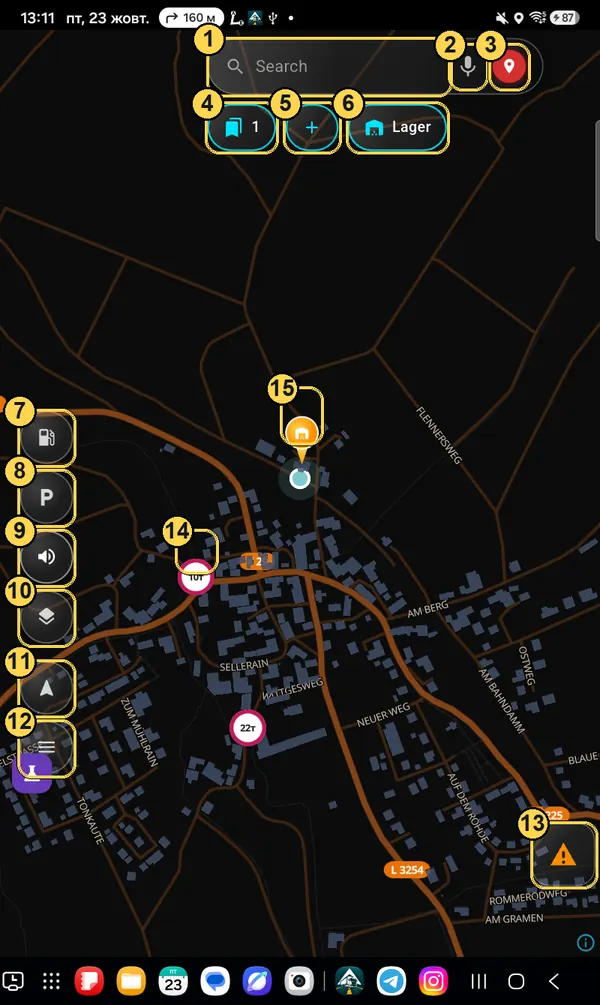
Main screen with marks 1–15
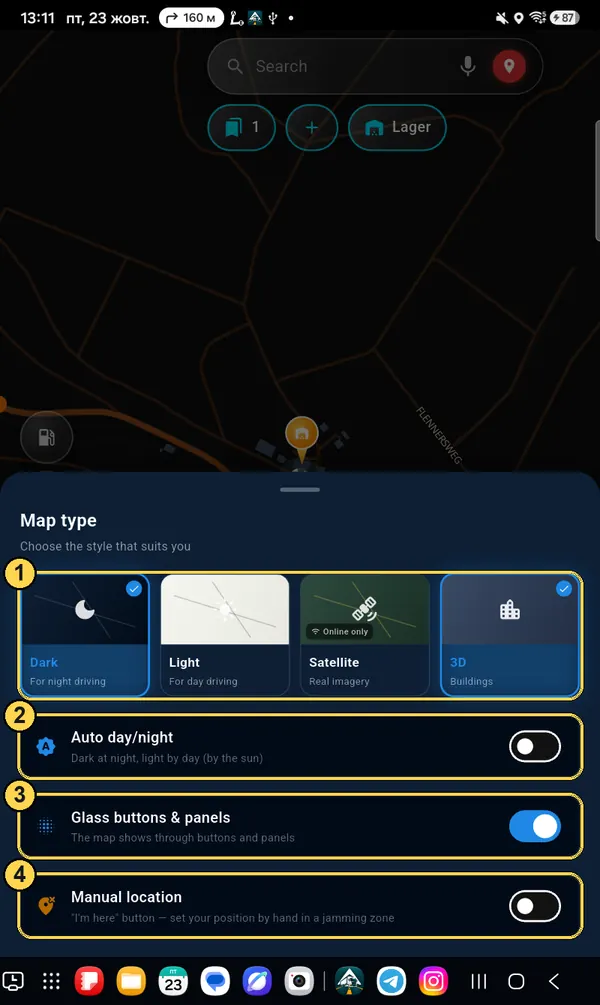
“Map type” button

Map look

  1. 1Dark (for night), light (for day), satellite (internet only) and 3D buildings.
  2. 2Auto day/night — dark at night, light in the day, follows the sun by itself.
  3. 3Glass buttons & panels — the map shows through them. Turn off if hard to read in the sun.
  4. 4Manual location — the “I'm here” button lets you set your position by hand where GPS is jammed.
Map type panel with marks 1–4

How to build a route and go

From an empty map to navigation — 6 steps. The first time, the app will also ask for a truck profile: it takes a minute and only happens once.

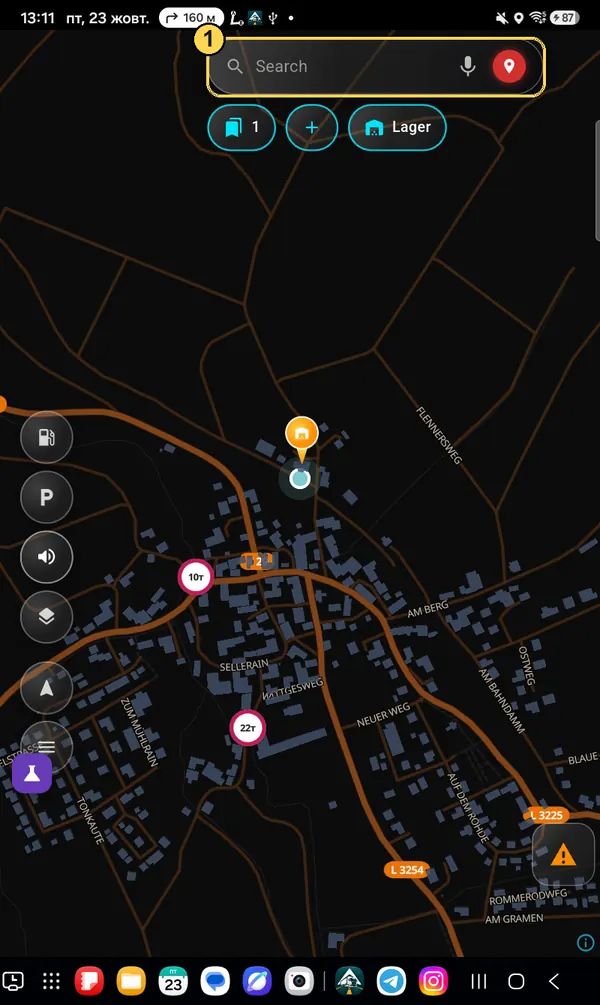
Step 1

Tap the “Search” field

It is at the top of the map screen. You can also tap the microphone on the right and say the address.

Main screen: Search field circled, number 1
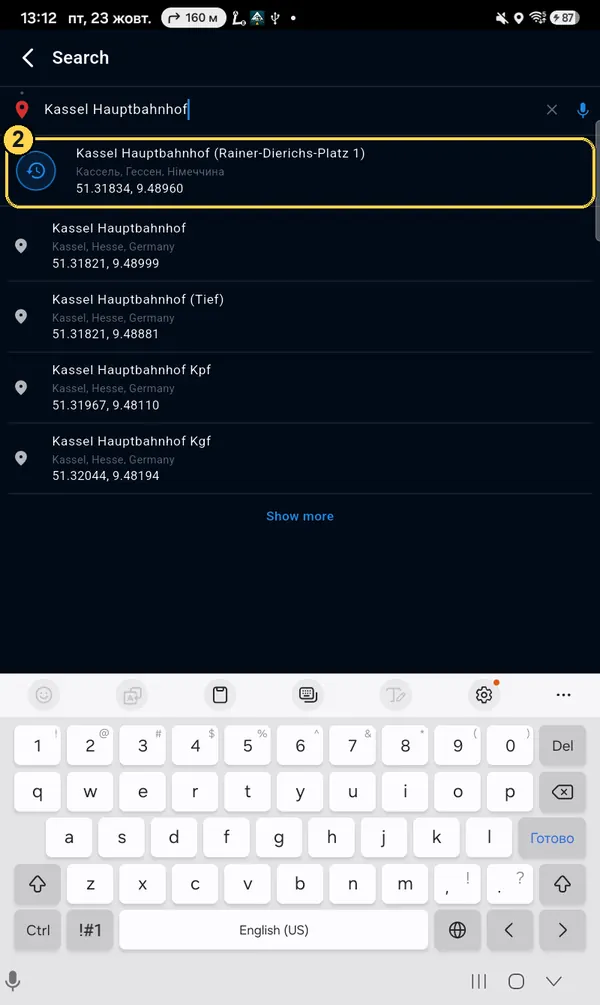
Step 2

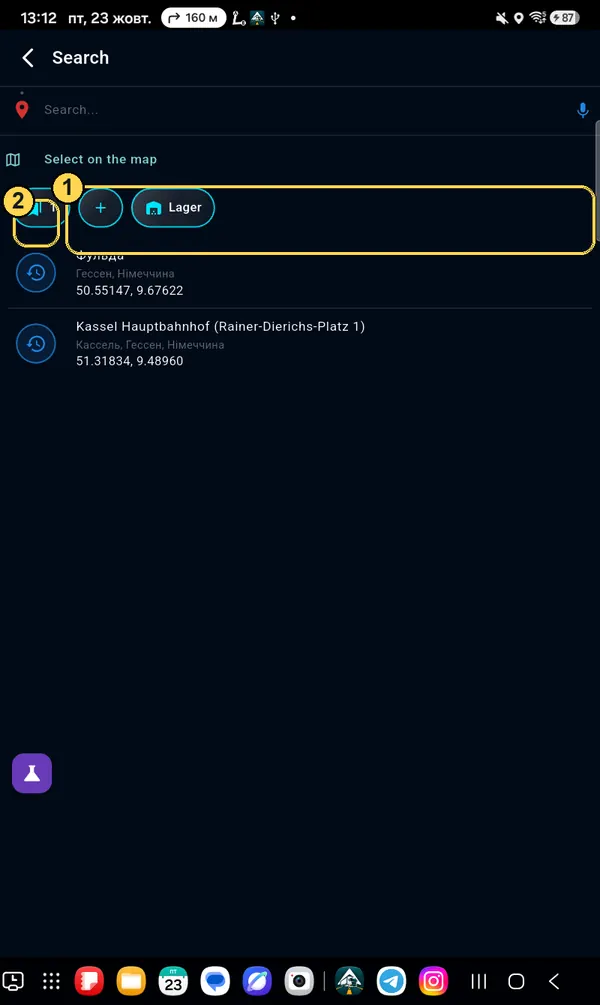
Type the address and pick it from the list

City and street, name of a warehouse or fuel station, or coordinates (for example, 51.318, 9.489). Tap the right line.

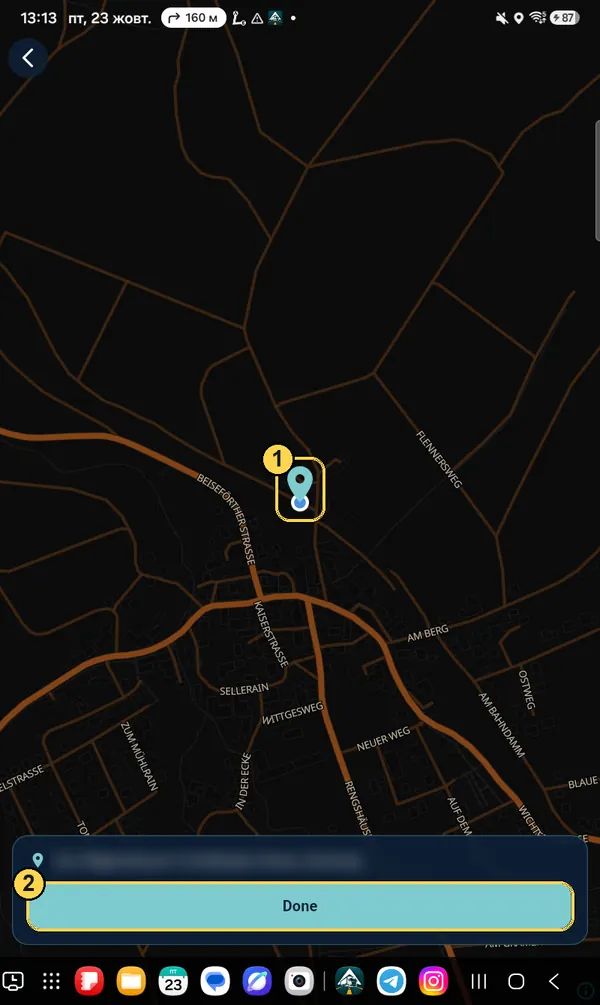
Nothing found? Tap “Select on the map” and set the point with your finger.
List of search results, first line circled, number 2
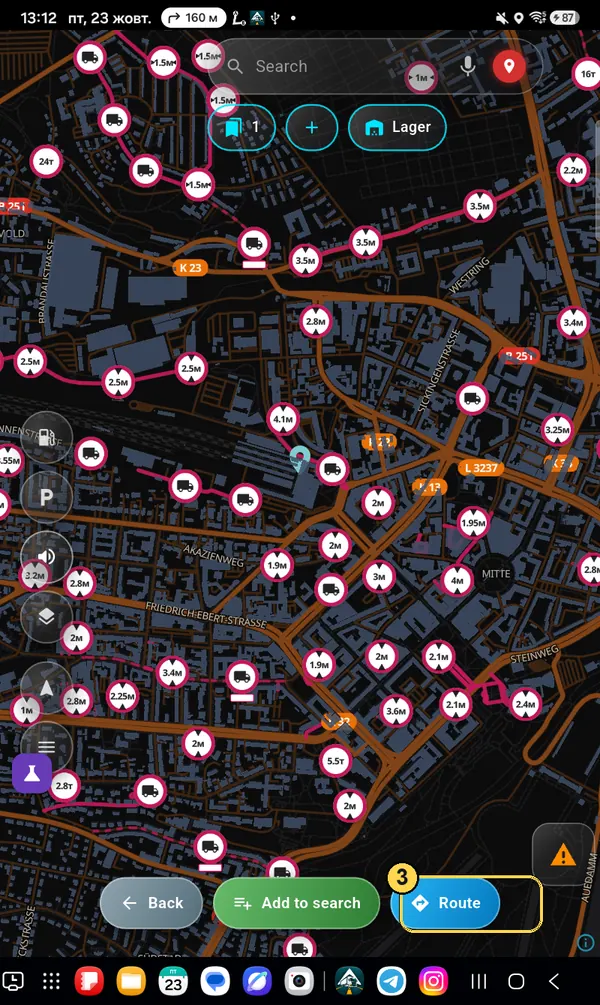
Step 3

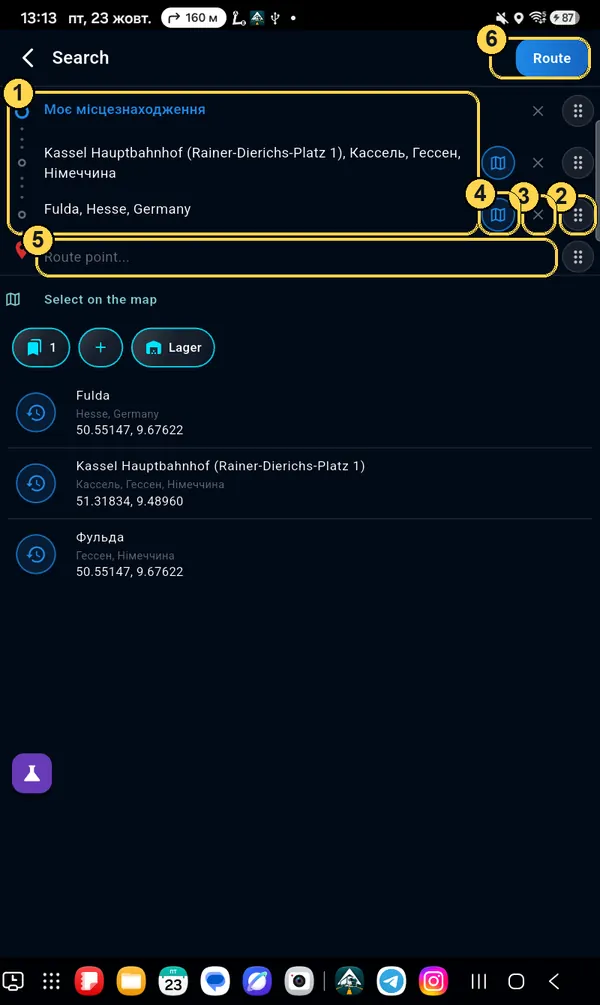
Tap “Route”

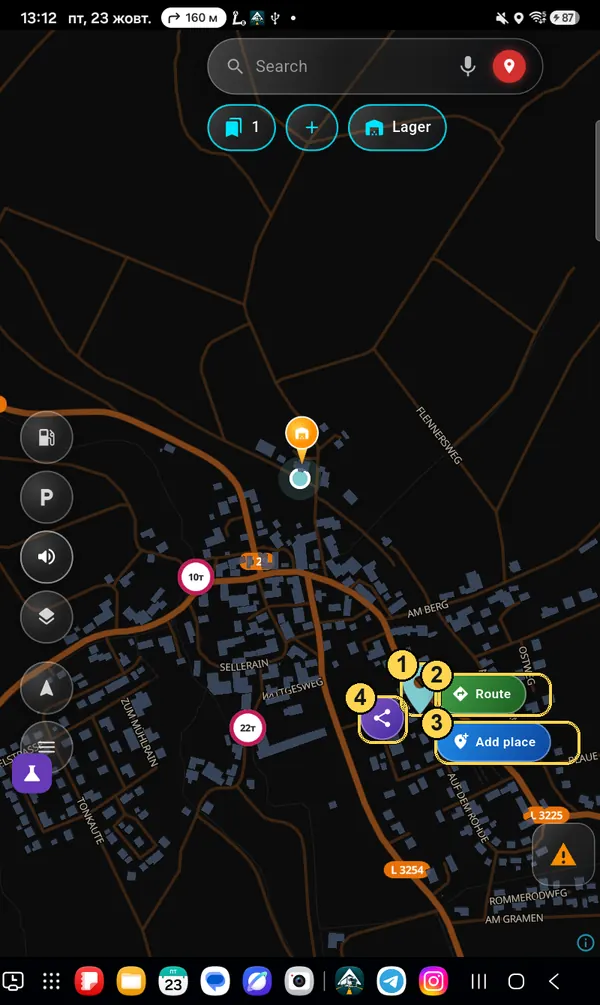
The point appears on the map, with three buttons at the bottom. Route builds the way from where you are now.

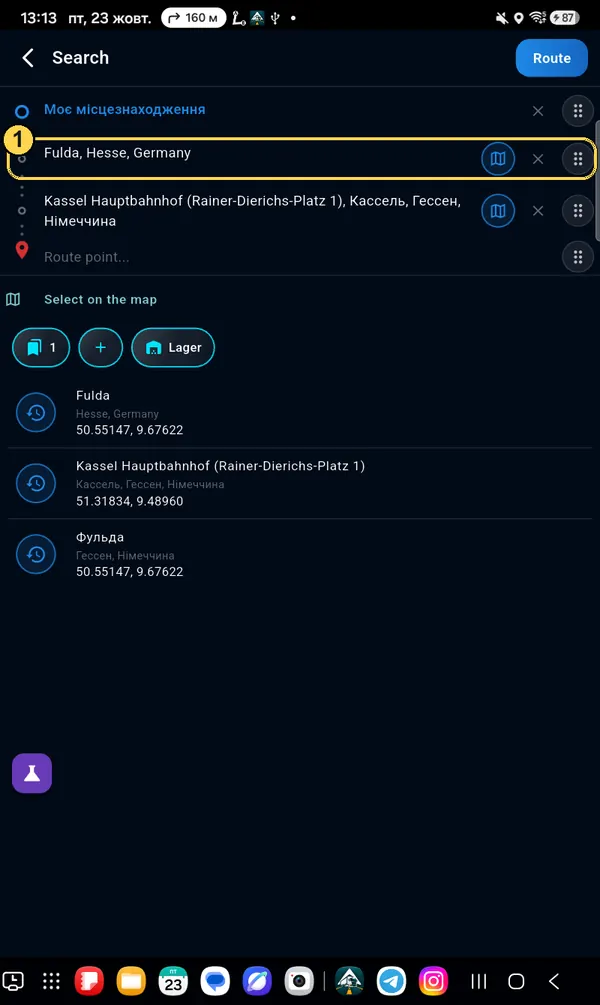
Add to search — if you need to stop somewhere else on the way.

Point on the map and Route button circled, number 3
First time only

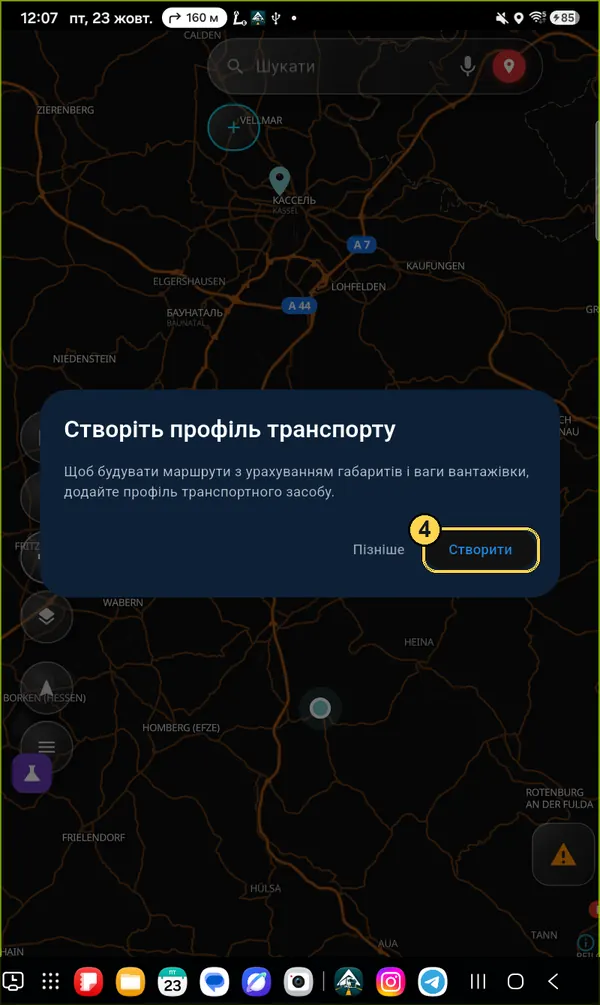
Create a truck profile

Without a profile the app does not know your size and cannot avoid low bridges and bans. Tap Create.

Create a vehicle profile window, Create button circled
First time only

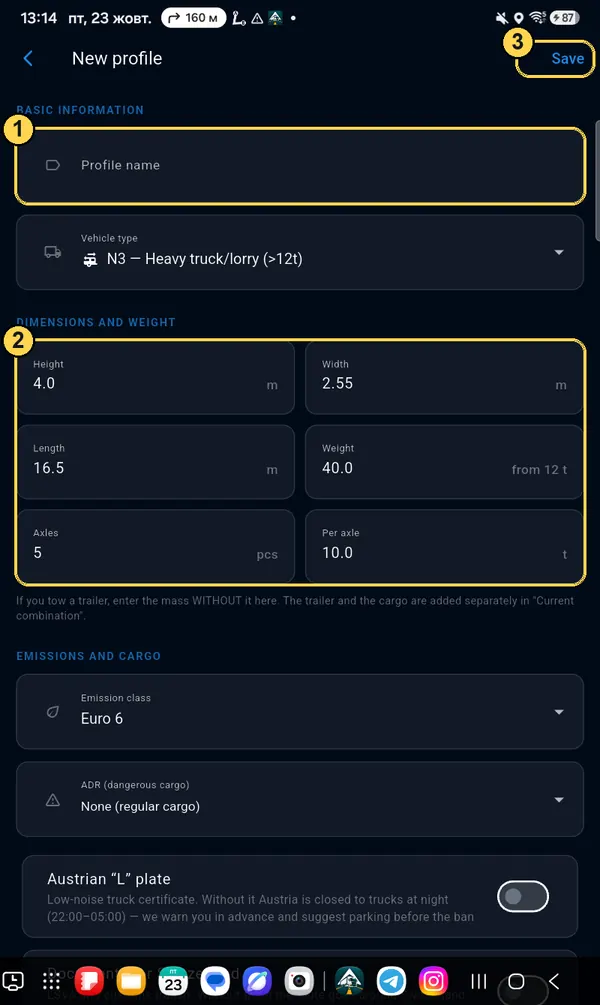
Fill in the dimensions and save

  1. 1Name — anything, for example the plate number.
  2. 2Height, width, length, weight and axle load. Typical values for a 40 t truck are filled in — check yours, especially height.
  3. 3Save — top right.
The trailer and cargo weight are added separately, in “Current combination”. The profile is the tractor without a trailer.
New profile form with marks 1, 2, 3
First time only

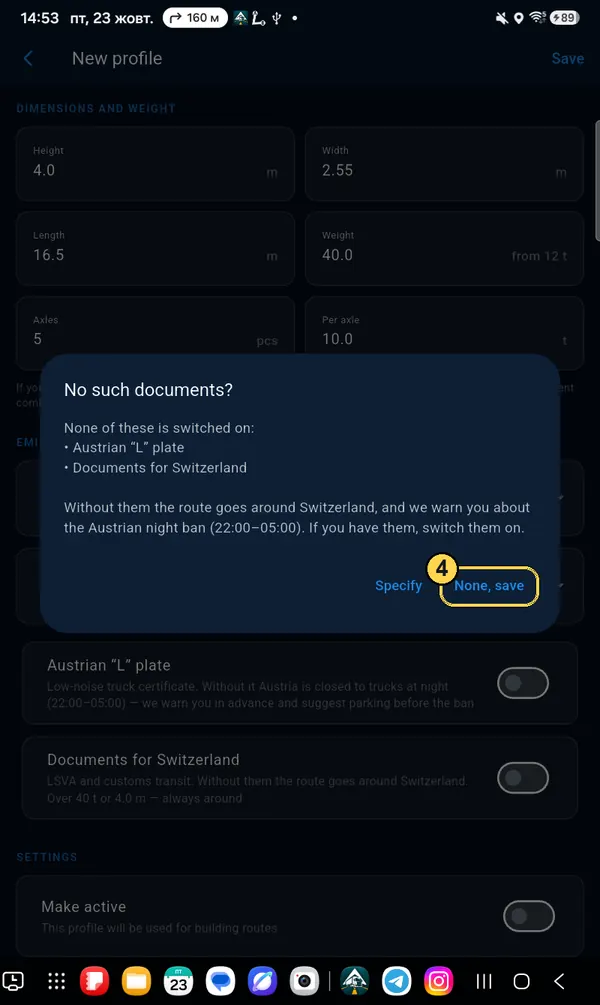
Question about documents

If you have no “L” plate for Austria (low-noise truck) or no documents for Switzerland, tap None, save. The route will avoid Switzerland, and the app will warn you in advance about the night ban in Austria.

No such documents? window, None, save button circled
Step 4

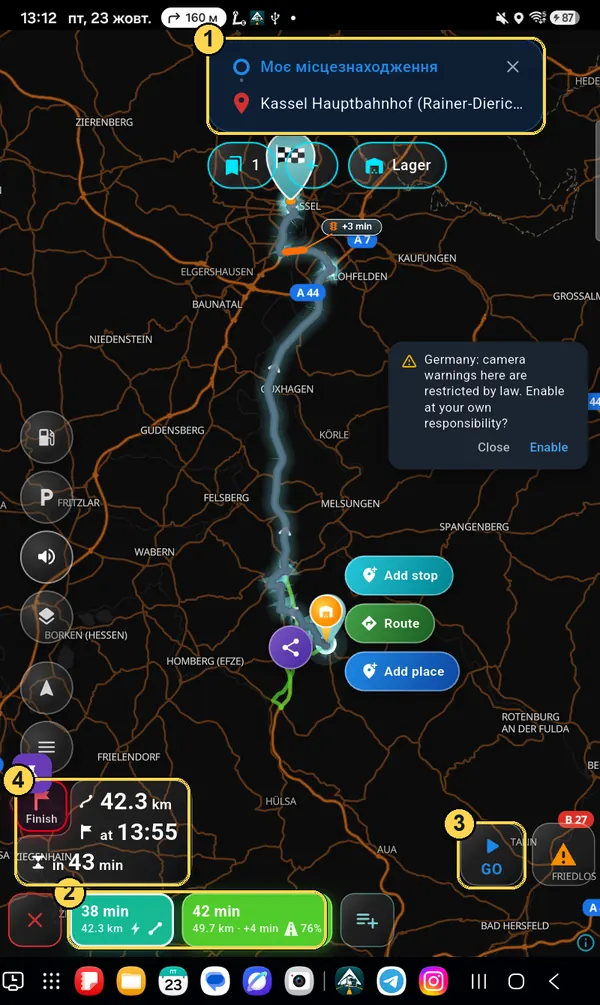
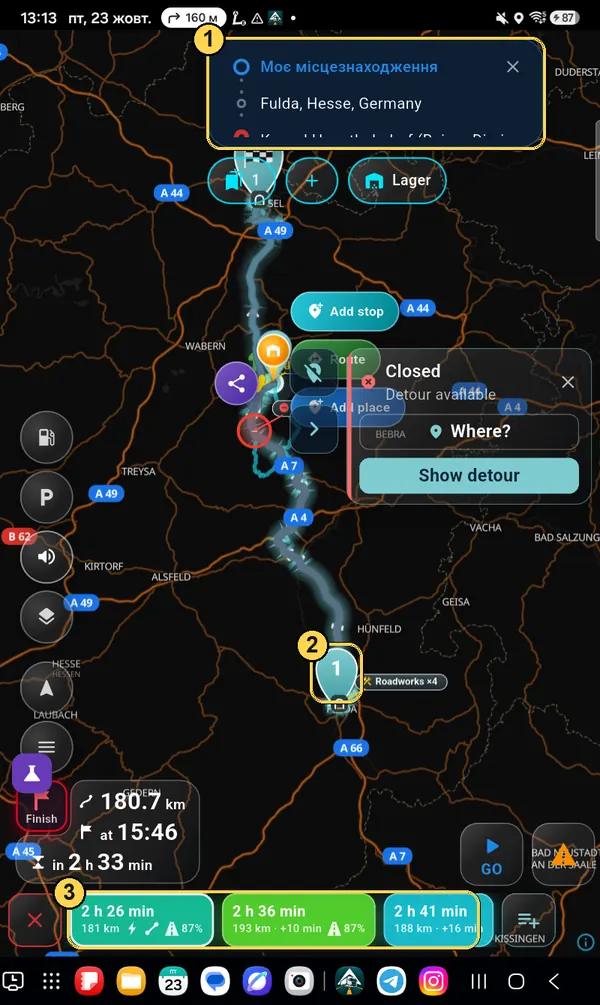
Check the route and tap GO

  1. 1From and to. The cross on the right clears the route.
  2. 2Route options: time and kilometres. Tap another option — the line on the map changes.
  3. 3GO — start navigation.
  4. 4How many kilometres, when you arrive and how long you drive.
Route overview with marks 1–4
Step 5

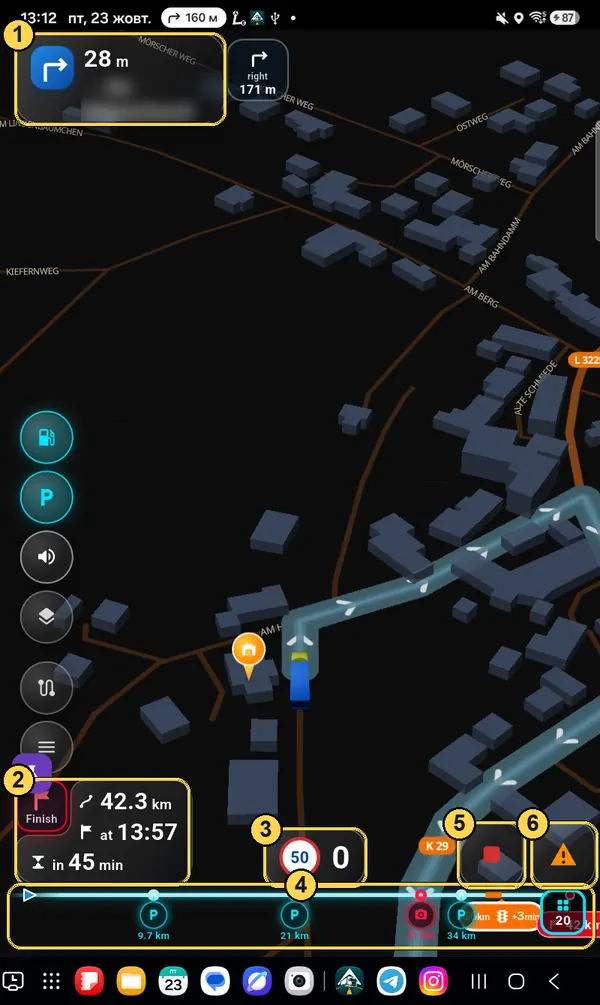
Drive: what is on the screen

  1. 1Next turn: where to turn, in how many metres and onto which street. Next to it — the turn right after that.
  2. 2Arrival time. The red “Finish” square switches between time to the finish and time to the next stop (when there are stops).
  3. 3Speed limit and your speed.
  4. 4Route line: what is ahead — parking, fuel stations, cameras, jams — and in how many kilometres.
  5. 5Stop — end navigation.
  6. 6Report a road event: jam, roadworks, police, closed road.
Navigation screen with marks 1–6

Truck profile and trailer

The route is built for your dimensions. Wrong height or weight — and the navigator may send you under a low bridge or where you are not allowed. That is why this section is the most important.

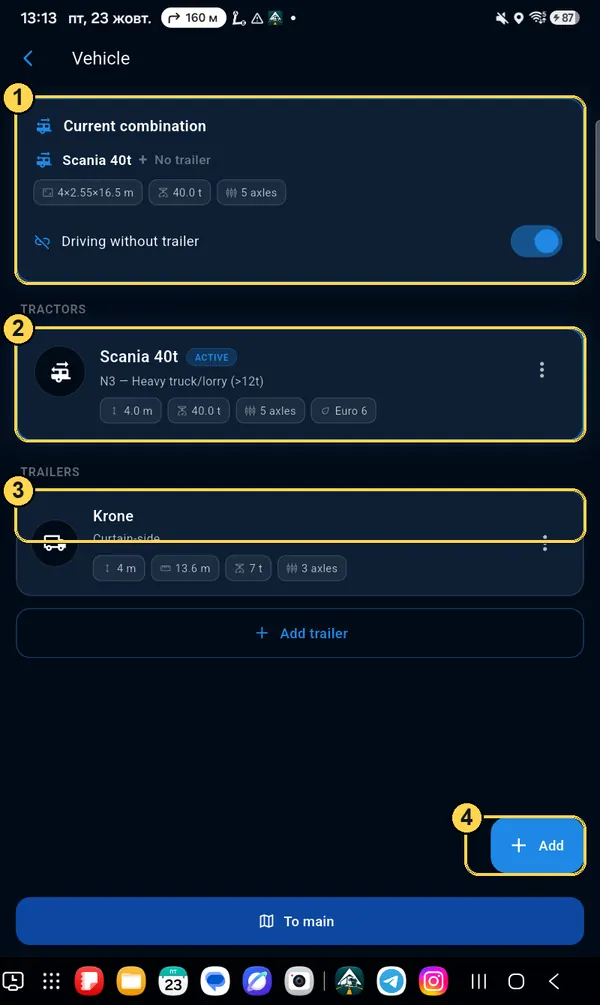
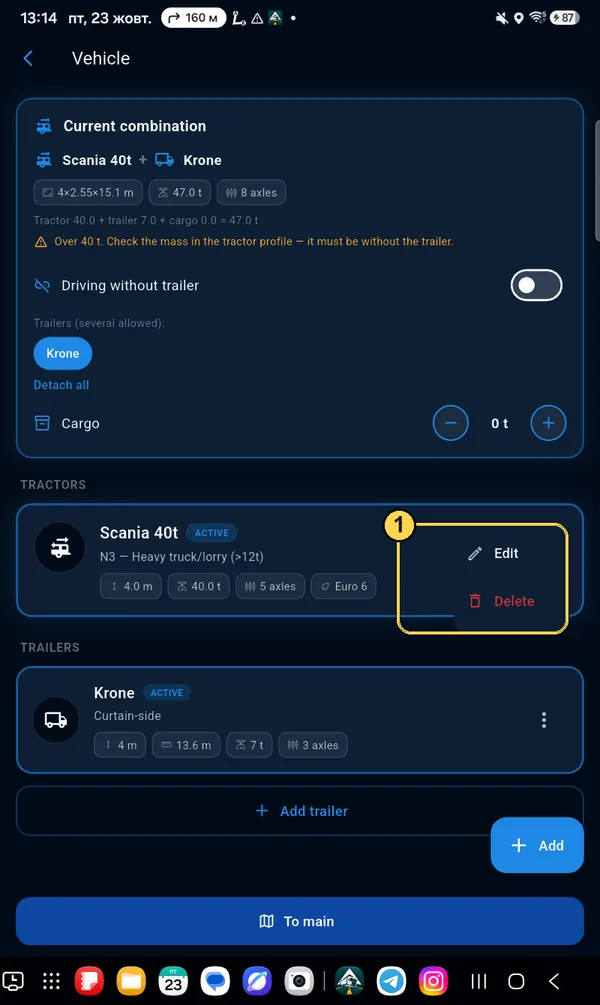
Menu → Vehicle

What is on this screen

  1. 1Current combination — what you drive with now: tractor, trailer and cargo. The route is built for it.
  2. 2Your tractors. The ACTIVE mark — the one in use now.
  3. 3Add trailer — if you drive with a semi-trailer or a trailer.
  4. 4Add — one more tractor (for example, when you change to another truck).
Vehicle screen with marks 1–4
Tractor

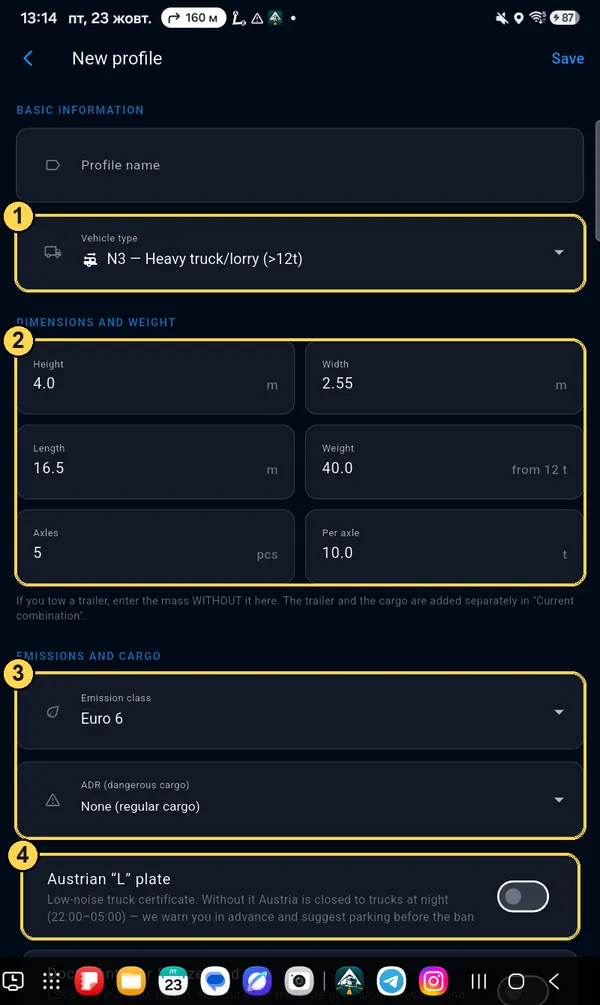
Profile fields

  1. 1Type: N1 (up to 3.5 t), N2 (3.5–12 t), N3 (over 12 t) or Camper. Bans depend on the type.
  2. 2Height — at the highest point (with a trailer — the highest of the two). Width, length, weight, number of axles and axle load.
  3. 3Euro class (for low-emission zones in cities) and ADR — dangerous goods class. With ADR the route avoids forbidden tunnels.
  4. 4“L” plate for Austria and documents for Switzerland. Without “L” the app warns you about the night ban in Austria; without documents it avoids Switzerland.
Important: if you drive with a semi-trailer, enter the weight of the tractor without the trailer in the tractor profile (for example 8 t). The trailer and cargo are added separately — see below.
Tractor profile form with marks 1–4
Trailer

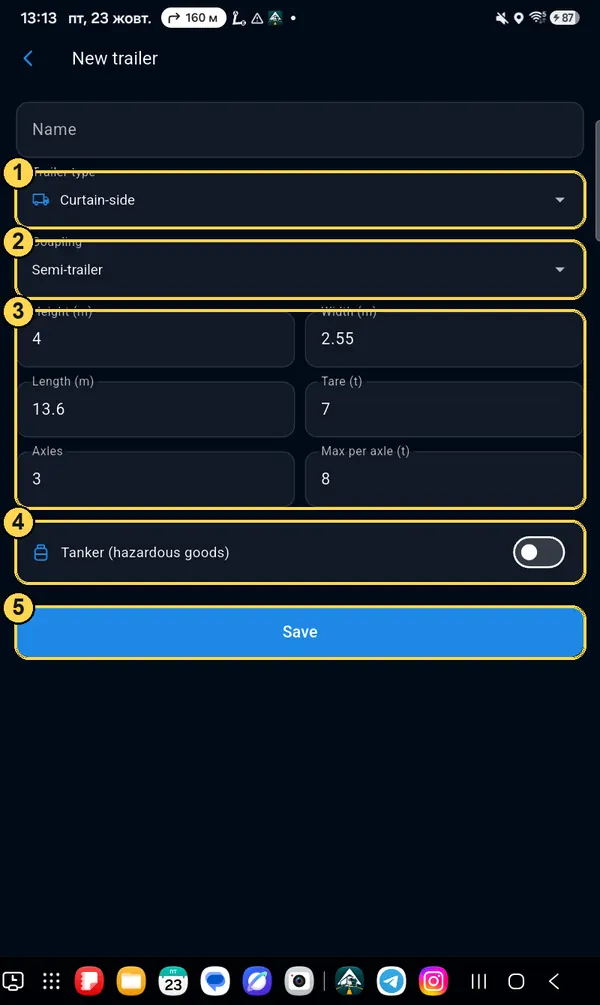
Add trailer

  1. 1Type: curtain-side, reefer, tanker and so on.
  2. 2Coupling: semi-trailer or drawbar trailer.
  3. 3Dimensions, empty weight (tare), axles and axle load.
  4. 4Tanker with dangerous goods — turn on if so.
  5. 5Save.
New trailer form with marks 1–5
Before the trip

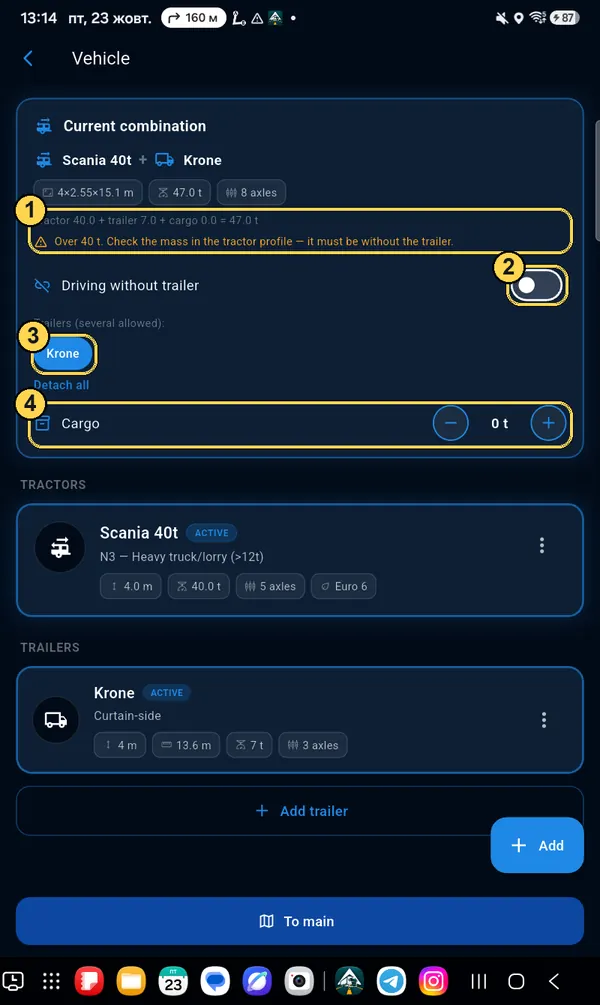
Set up the current combination

  1. 1Total weight: tractor + trailer + cargo. If it is over 40 t, the app will ask you to check the tractor weight — most often it has the weight with the trailer.
  2. 2“Driving without trailer” — turn it off to hook up a trailer.
  3. 3Tap the trailer name to hook it up or unhook it (you can have several).
  4. 4Cargo: with the − / + buttons, set how many tonnes you carry on this trip.
Current combination with a trailer, total weight and Cargo field
Change or delete

Three dots on the card

Tap ⋮ on the right of the tractor or trailer card: Edit — change the numbers, Delete — remove it completely (1).

Changed the profile when the route is already built? The app will offer to rebuild the route for the new dimensions.
Tractor card menu: Edit, Delete

Road events

See a jam, roadworks, a closed road or police — tell other drivers with two taps. Noticed an event is already gone — tell us too: this keeps the map true.

Orange triangle

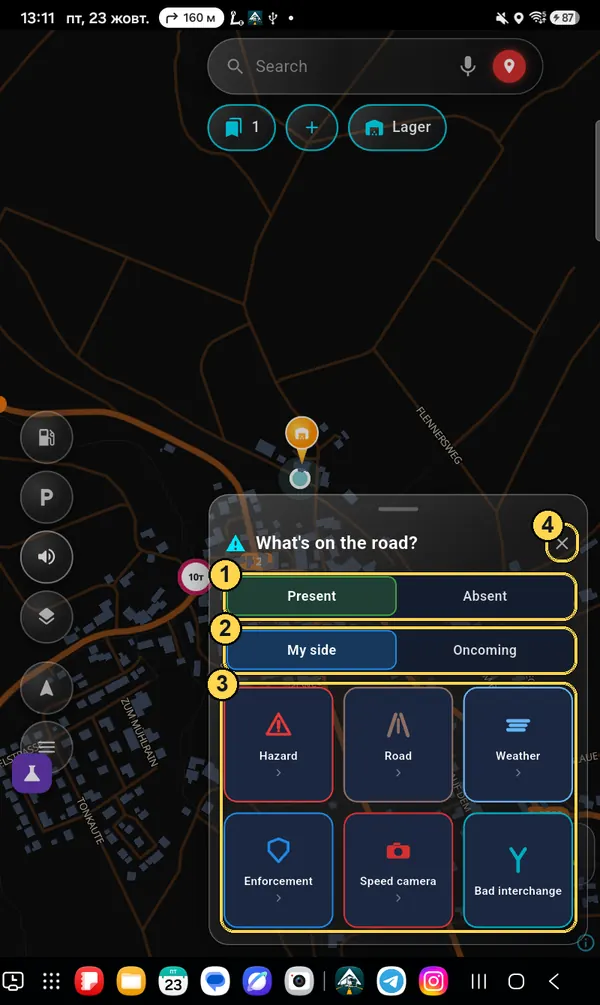
“What's on the road?”

  1. 1Present — the event is there. Absent — the map shows an event that is no longer there: tap it, and it disappears.
  2. 2My side or Oncoming — which side of the road.
  3. 3Six groups: Hazard, Road, Weather, Enforcement, Speed camera, Bad interchange. Tap — the sub-items open.
  4. 4✕ — close without sending anything.
The event is placed where you are now. If it is further on (for example, a closure after a turn), in the report step you can mark the place on the map with a point or a line.
What's on the road? window with marks 1–4
“Road” group

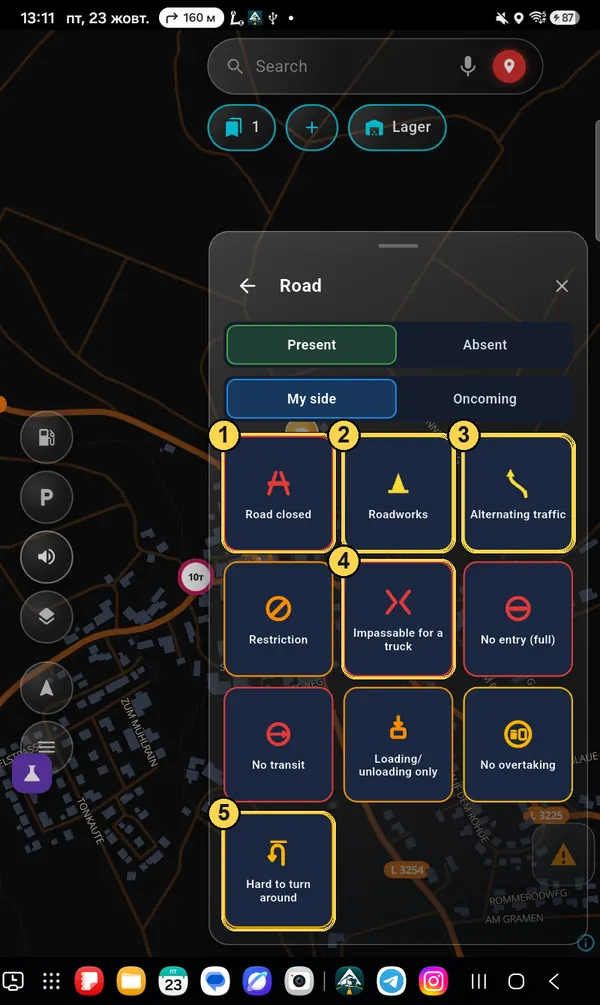
Closures, roadworks, bans

  1. 1Road closed — the app asks for how long (a day, 3 days, a week) and why. Other drivers get a detour.
  2. 2Roadworks.
  3. 3Alternating traffic — one lane, traffic takes turns; you can say how long you waited.
  4. 4Impassable for a truck — the road is there, but a truck physically cannot get through.
  5. 5Hard to turn around — dead end or narrow place.

Also here: Restriction (limit from a sign), No entry (full), No transit, Loading/unloading only, No overtaking. Restrictions and bans are first checked by a moderator, then they are used in everyone's routes.

Road group: 10 sub-items
“Hazard” group

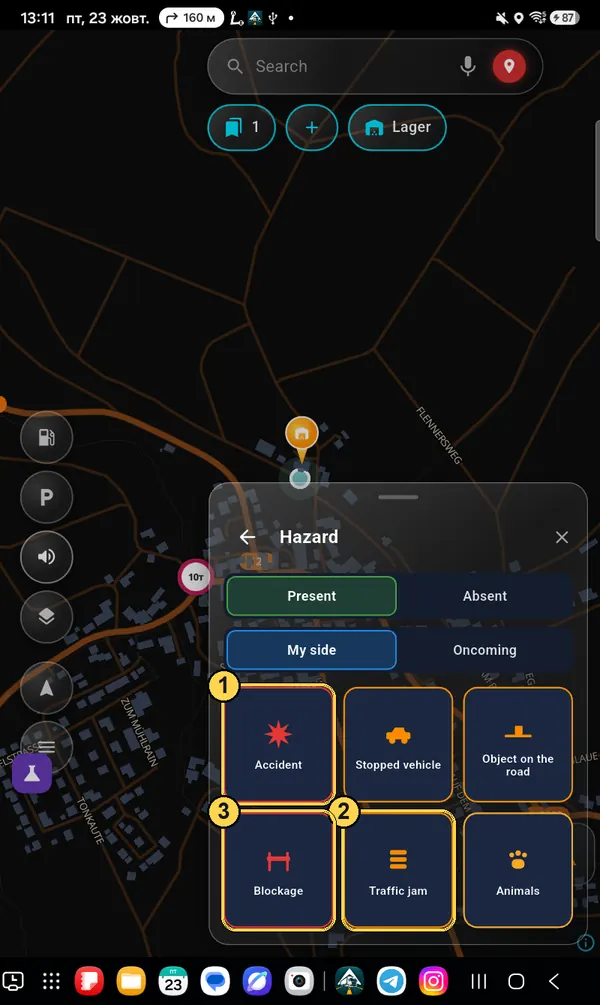
Accident, jam, obstacles

  1. 1Accident — the app asks which lanes are blocked.
  2. 2Traffic jam — and how much time you lose in it.
  3. 3Blockage — the road is blocked (for example, a protest or a barrier).

And also: Stopped vehicle, Object on the road, Animals.

Hazard group with marks
Weather · Enforcement · Speed camera

The other groups

Weather: Fog, Ice, Hail, Flood.

Enforcement: Patrol, Unmarked, Inspection. In countries where the law forbids warnings about police, some items are missing.

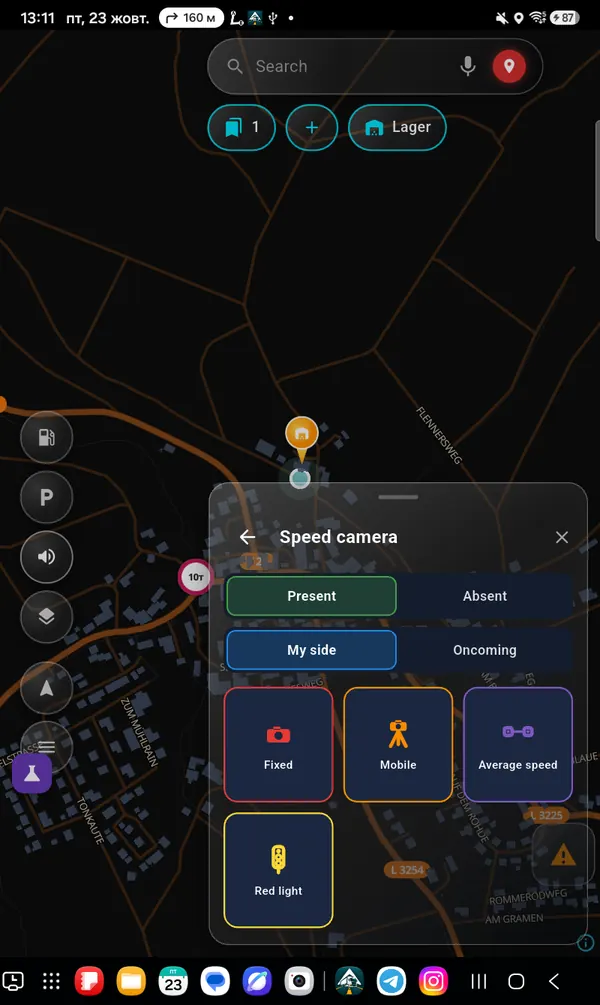
Speed camera: Fixed, Mobile, Average speed, Red light. You can enter the limit on the camera. Where the law forbids camera warnings, this group is missing.

Speed camera group
“Bad interchange” group

The navigator sent you the wrong way

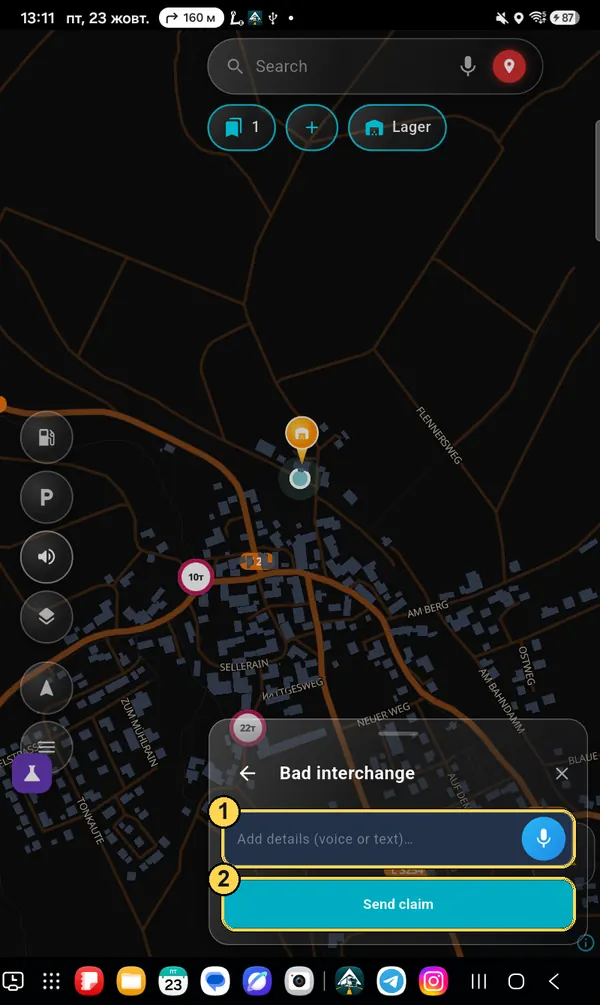
Wrong lanes, an unclear prompt, a wrong turn — describe it by voice or text (1) and tap Send claim (2). Your route and settings are added to the report automatically, so we can repeat the situation and fix it.

Bad interchange: description field and Send claim button

Settings

What to remove from the map, what to add, what to make bigger. Menu → Settings. Tap a section to open it.

Menu → Settings

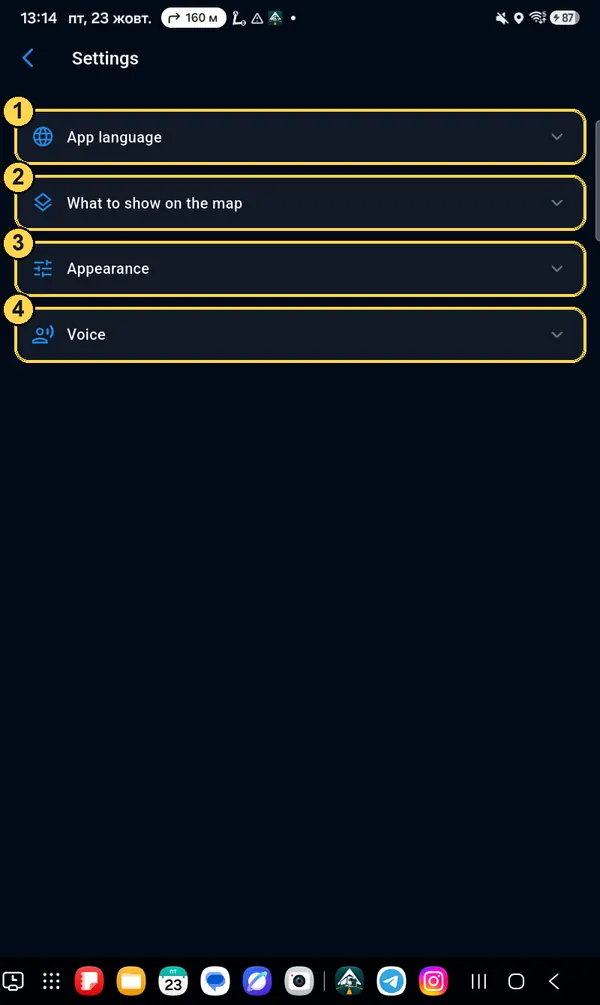
Four sections

  1. 1App language — language of menus and buttons (13 languages). The voice is set separately in «Voice».
  2. 2What to show on the map — buttons, cameras, driver markers, compass, icons on the line.
  3. 3Appearance — button layout, sizes, truck colour, font, restriction signs.
  4. 4Voice — voice, speech rate, turning music down.
Settings: four sections
What to show on the map

Place buttons

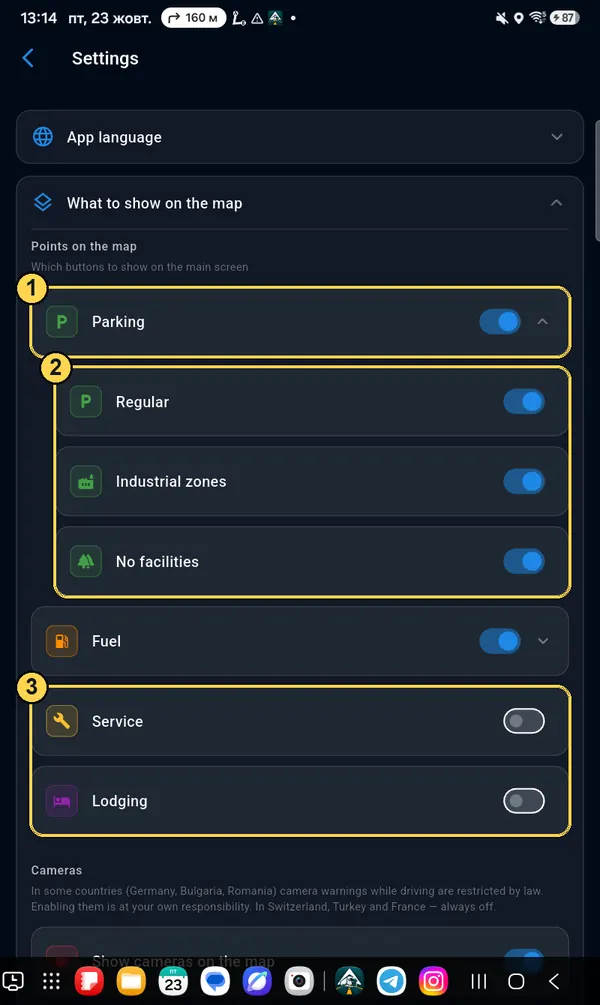
  1. 1Switch — show the button on the main screen. Arrow ⌄ on the right — open the subtypes.
  2. 2Parking subtypes: Regular, Industrial zones, No facilities. Turn off what you don't need — the map gets cleaner. For fuel: Diesel / Electric.
  3. 3Service (repair, truck wash, weighbridge, customs) and Lodging — off until you turn them on.
Turned on a new button? «Customize screen layout» opens right away, and the button sits in the middle of the map, selected. Drag it where you like and tap ✓.
Place buttons and parking subtypes
What to show on the map

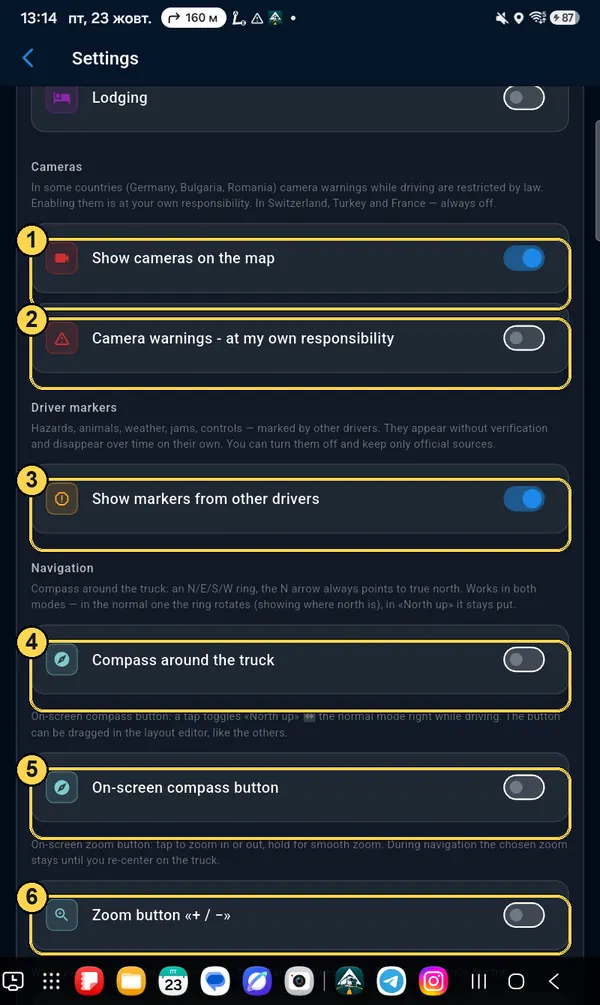
Cameras, driver markers, compass

  1. 1Show cameras on the map — the main switch for cameras.
  2. 2Camera warnings while driving where the law limits them (Germany, Bulgaria, Romania) — only after you agree. In Switzerland, Turkey and France they are always off.
  3. 3Show markers from other drivers — jams, hazards, police reported by drivers. Turn off if you want official sources only.
  4. 4Compass around the truck — a ring with north, south, east and west.
  5. 5On-screen compass button — switches «North up» right while driving.
  6. 6Zoom button «+ / −» — for those who find pinching hard (tablet on the windscreen, stylus).
Cameras, driver markers, compass, zoom
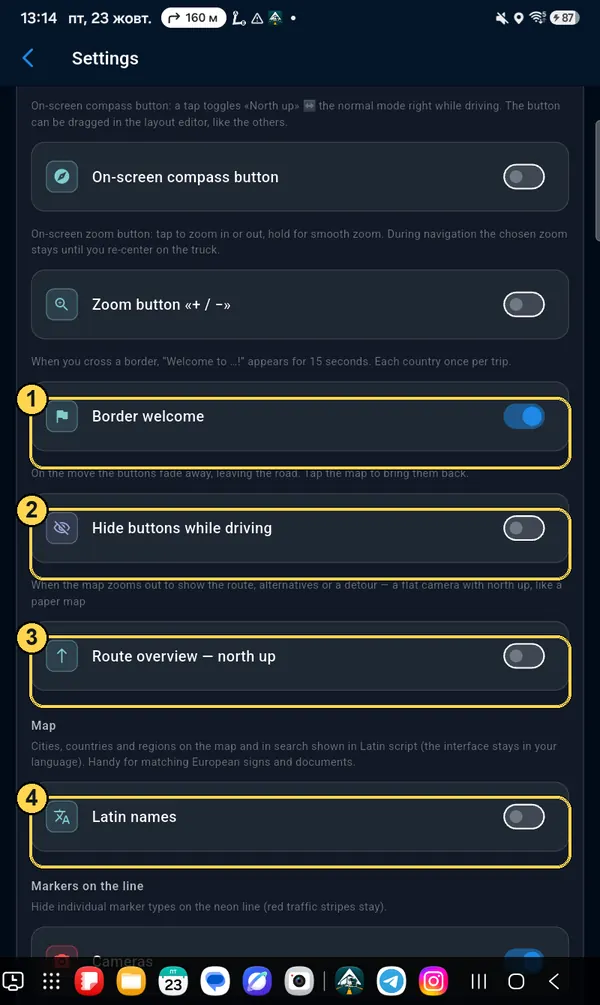
What to show on the map

While driving

  1. 1Border welcome — «Welcome to …!» for 15 seconds, once per trip.
  2. 2Hide buttons while driving — when moving, buttons disappear and you see only the road. Tap the map to bring them back.
  3. 3Route overview — north up: when the map zooms out to show the whole route, it stays straight, like a paper map.
  4. 4Latin names — cities and countries in Latin letters, to compare with signs and documents.
Border welcome, hide buttons, overview, Latin names
What to show on the map

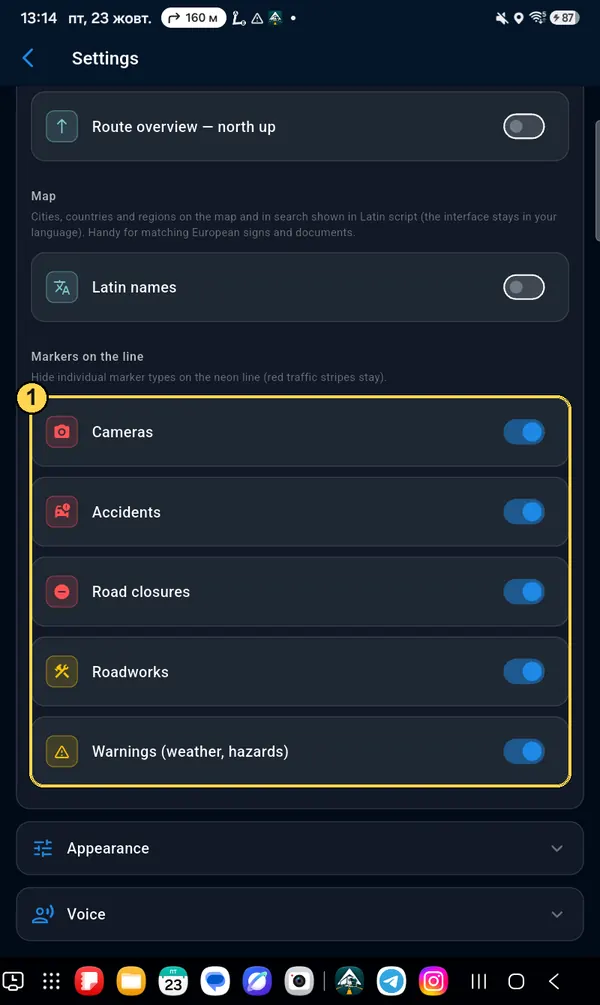
Markers on the line

The route line at the side of the screen shows what is ahead. Here you can hide some icon types: cameras, accidents, closures, roadworks, warnings (1). Red jam bars always stay.

Five switches for icons on the line
Appearance

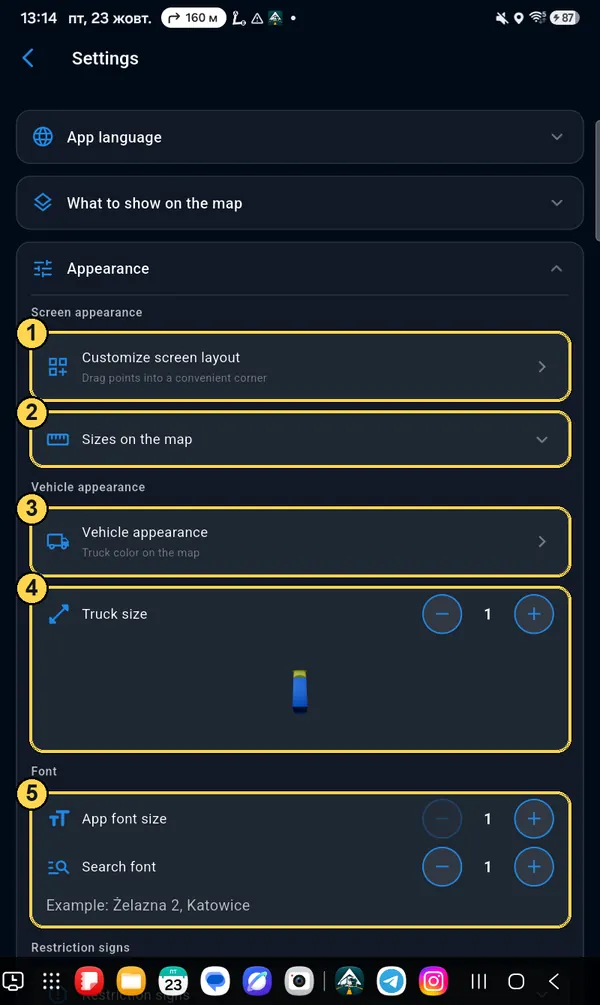
Sizes, truck, font

  1. 1Customize screen layout — move buttons and make them bigger (separate chapter below).
  2. 2Sizes on the map — size of fuel and parking icons and of your marker.
  3. 3Vehicle appearance — truck colour on the map, or an arrow.
  4. 4Truck size — with the − / + buttons, you see it at once.
  5. 5App font size and Search font — bigger letters if it is hard to read.
Appearance section with marks 1–5
Appearance

Restriction signs

  1. 1Show restrictions — the main switch for signs and ban lines. Below it — yellow lines where trucks may not overtake.
  2. 2Signs size and «Weight from»: show weight signs only from the weight you need (for example, from 7.5 t).
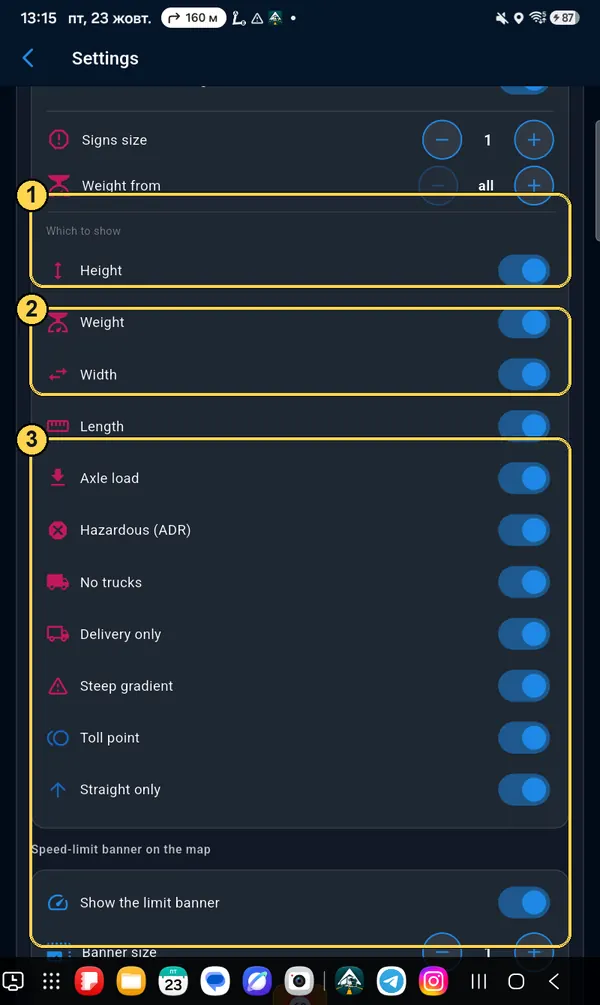
  3. 3Which to show — separately height, weight, width, length, axle, ADR, «no trucks», «unloading only», gradient, toll point, «straight only».
This is only what the map shows. The route still avoids everything that does not fit your profile.
Restriction sign settings
Appearance

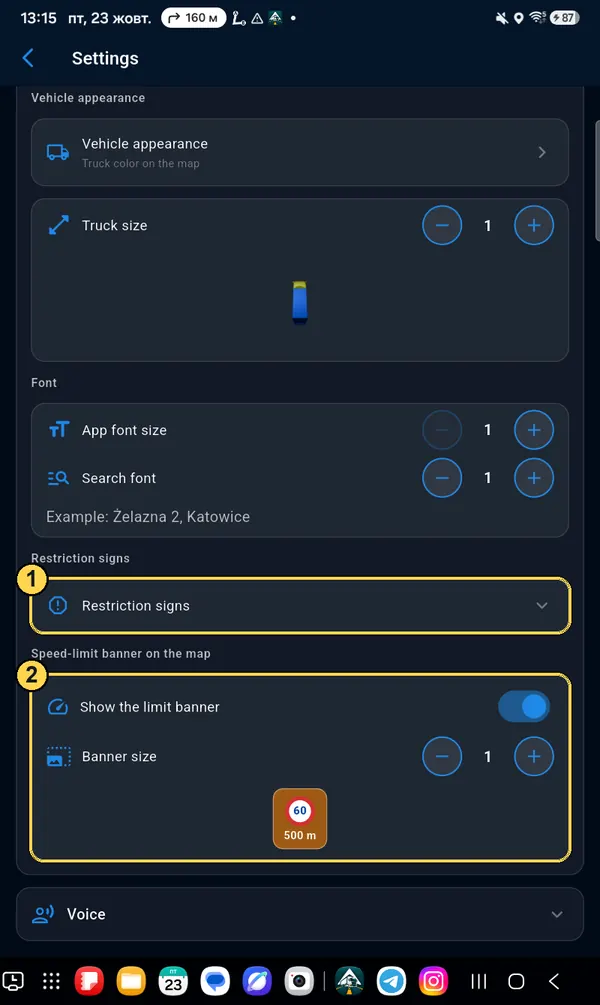
Speed-limit banner

  1. 1Restriction signs — open the settings described above.
  2. 2Limit banner — an orange plate «60 · in 500 m» before the speed limit changes. You can turn it off or change its size (Show the limit banner).
Limit banner on the map
Voice

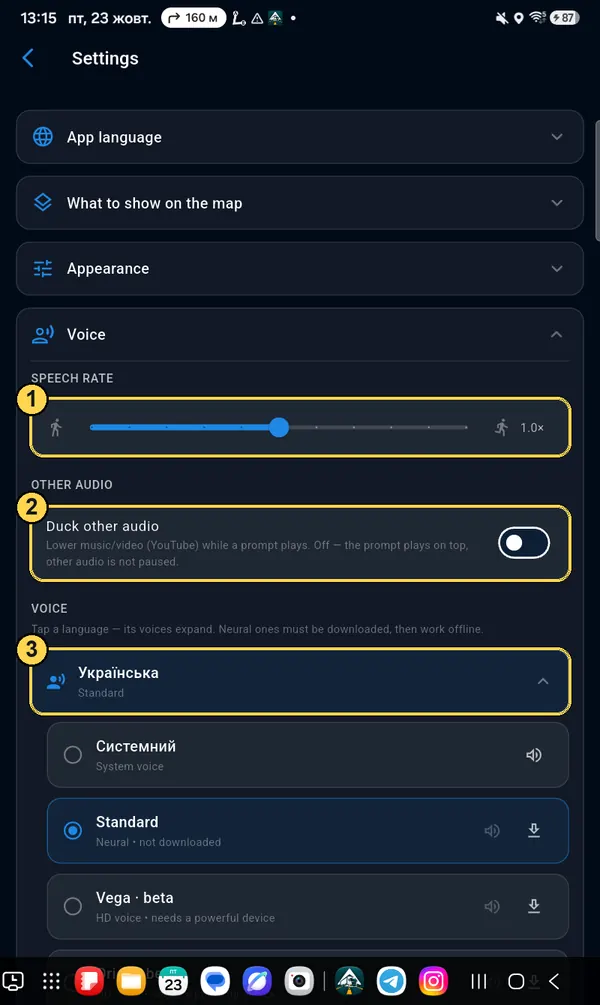
Speed and music

  1. 1Speech rate — a slider from 0.5× (slow) to 1.5× (fast).
  2. 2Duck other audio — while a prompt plays, music, radio or YouTube gets quieter. Off — the prompt plays over it.
  3. 3Voice — tap a language to open the list of its voices.
The voice language does not depend on the menu language: you can have the menu in English and the prompts in Polish or German.
Voice: speech rate, other audio, voice
Voice

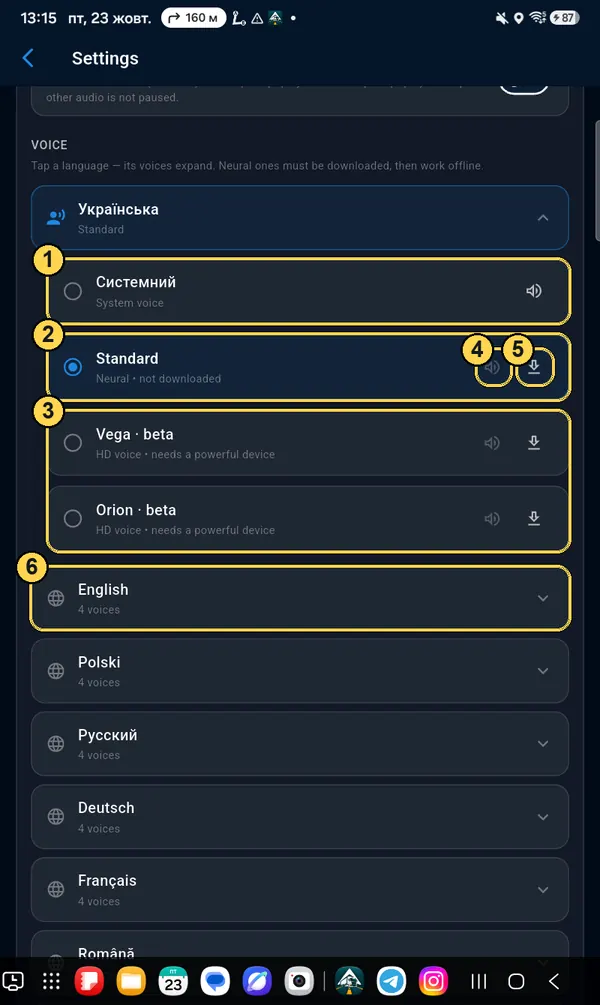
Change the voice

  1. 1System — the phone's own voice. Works right away, sounds different on different phones.
  2. 2Standard — our voice, the same on all phones. Download it once.
  3. 3HD voices (Vega, Orion) — the most natural, but they need a powerful device.
  4. 4Speaker — listen to a sample before you choose.
  5. 5Arrow — download the voice. After download it works without internet. Bin — delete it to free up space.
  6. 6Other languages — each with its own voices.

To choose a voice, tap the circle to the left of it.

List of voices: system, standard, HD

Screen layout: move, resize, two modes

Every button and window can be dragged, made bigger or smaller. Portrait and landscape are set up separately, and each also has a «split screen» option, for when the navigator takes half the screen next to another app.

Settings → Appearance → Customize screen layout

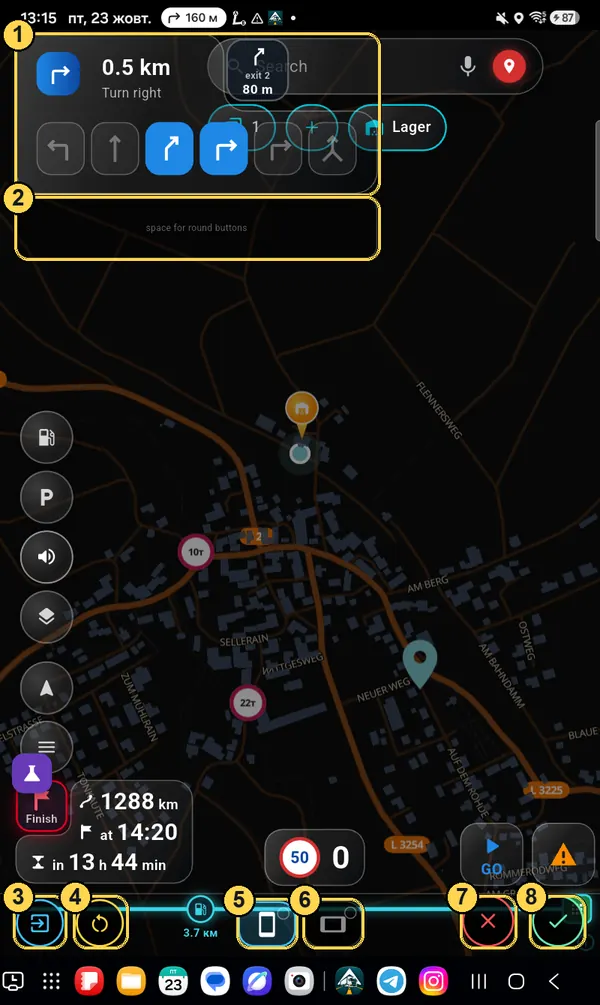
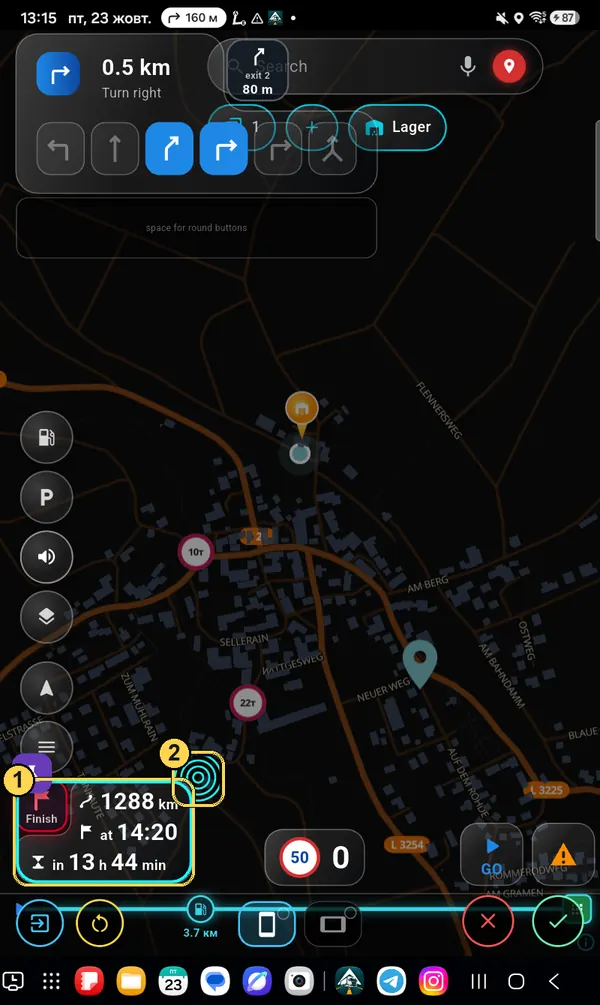
What is on the editor screen

  1. 1Windows are shown with an example (maneuver, search, arrival time), so you see their real size.
  2. 2Grey zone «space for round buttons» — buttons line up here in a neat row.
  3. 3Leave the editor — back to Settings, with the «Appearance» section already open.
  4. 4Reset — bring back the standard layout or your saved one.
  5. 5Portrait screen — the one you are setting up now (lit).
  6. 6Landscape screen. Circle in the corner: green tick — already set up, empty — not yet.
  7. 7✕ — undo changes back to the last save.
  8. 8✓ — save.
Screen layout editor with marks 1–8
Move

Drag with your finger

Hold a button or window and drag it where you like. Let go — it snaps to the grid. Buttons never overlap: if the spot is taken, the button goes next to it.

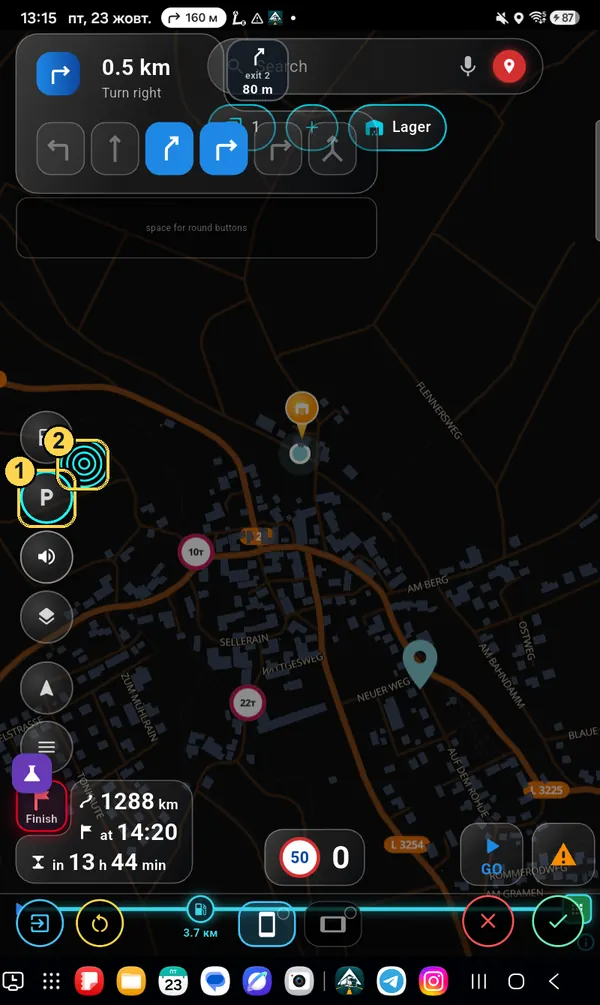
Make bigger or smaller

  1. 1Tap a button — it gets a light-blue frame.
  2. 2Circle with waves in the corner — drag outwards to make bigger, inwards to make smaller. Tap it — one step bigger.
Round buttons change size all together, so the row stays even. Tap the button again to deselect it.
Selected P button and the size circle
Windows

Same for big windows

Arrival time, maneuver, speedometer, search: tap — frame (1), circle (2) — size. You can also spread a big window with two fingers. Drag the search sideways to make it longer or shorter.

Selected arrival time window
Maneuver window

Size of the parts inside the window: two taps

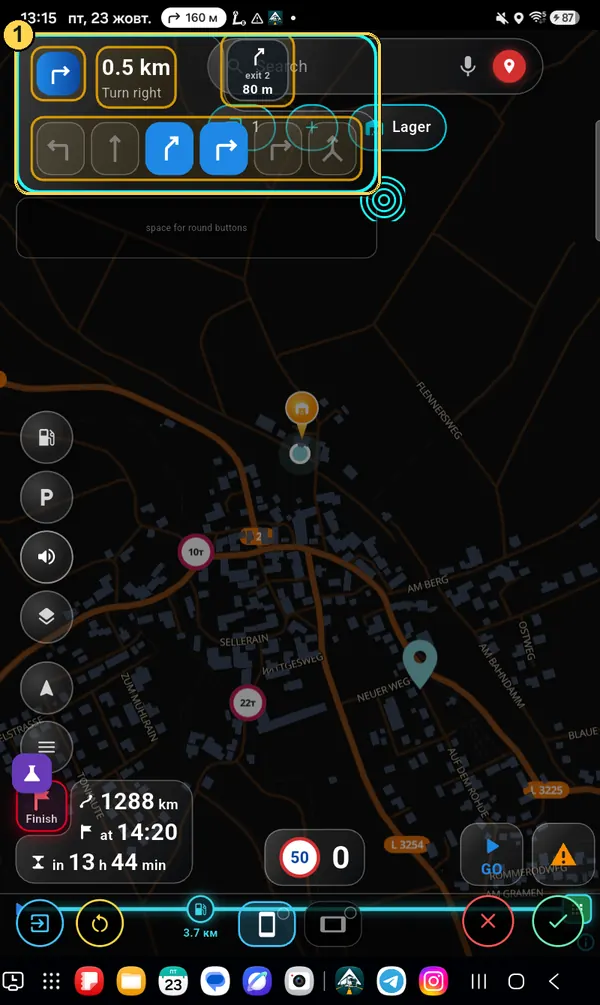
The maneuver window has several parts: the arrow, the distance and street name, the lanes, and the “next maneuver” square. You can make each one bigger or smaller on its own.

  1. 1First tap on the window — the whole window gets a turquoise frame: you can drag it and change its overall size. The parts inside get a yellow frame — now you can pick them.
First tap: the whole maneuver window is selected, the parts have yellow frames
Maneuver window

Second tap — on a part

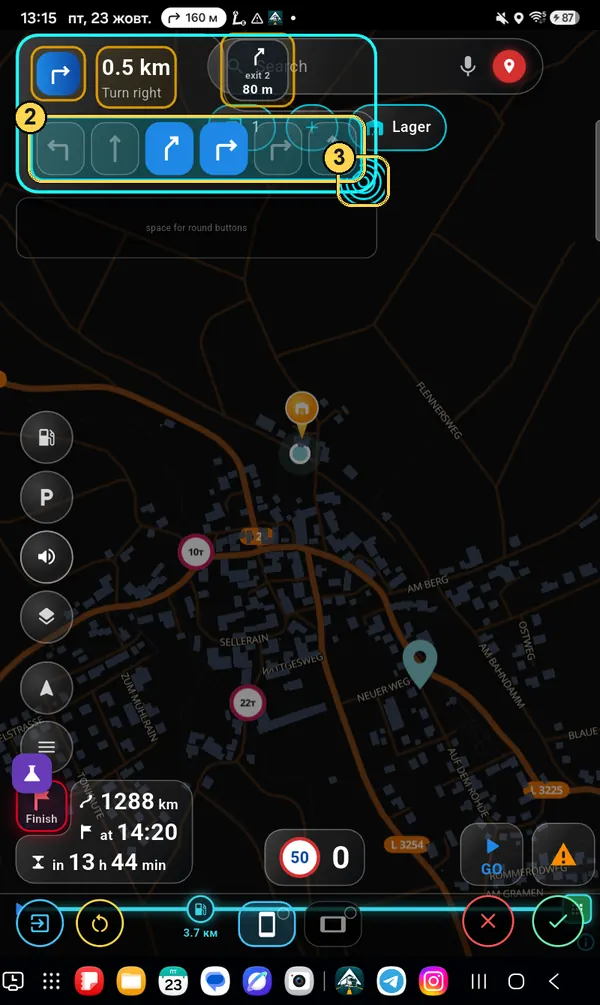
  1. 2Second tap on the part you need (here — the lanes): it turns turquoise.
  2. 3Drag the circle or the part itself down and to the right — bigger, back — smaller. Drag the street name sideways to make the field wider.
The other parts stay as they were. So you can have, for example, big lanes and a small street name.
Second tap: the lanes are selected in turquoise with the size circle
Two modes + split

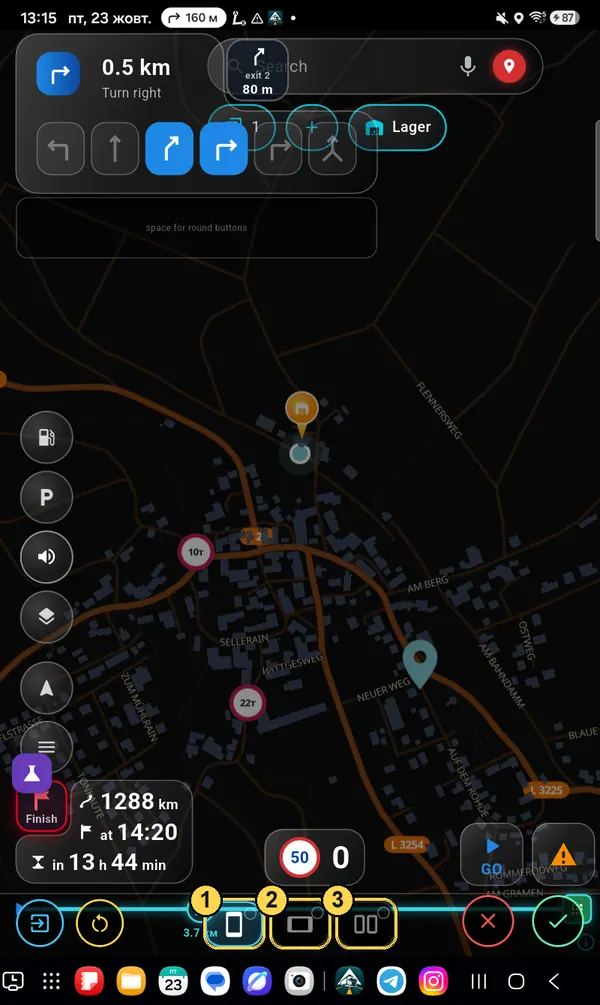
Portrait, landscape, half screen

  1. 1Portrait screen.
  2. 2Landscape screen.
  3. 3Split screen — appears after you tap 1 or 2. Sets up the layout for when the navigator is open on half the screen next to another app.
Each mode is a separate layout. Set up portrait — then rotate the device and set up landscape, or the buttons there stay as they were.
Three mode squares
Split screen

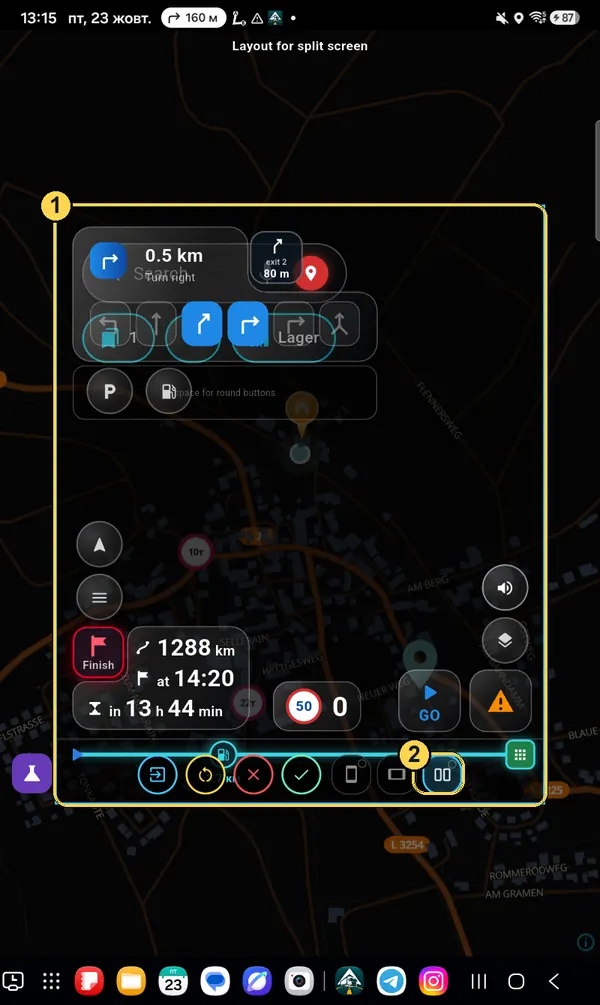
The «Layout for split screen» frame

The light-blue frame (1) shows how much space the navigator will have on half the screen. Place the buttons inside the same way — by dragging. To go back to full screen, tap the split square again (2).

Layout for split screen frame
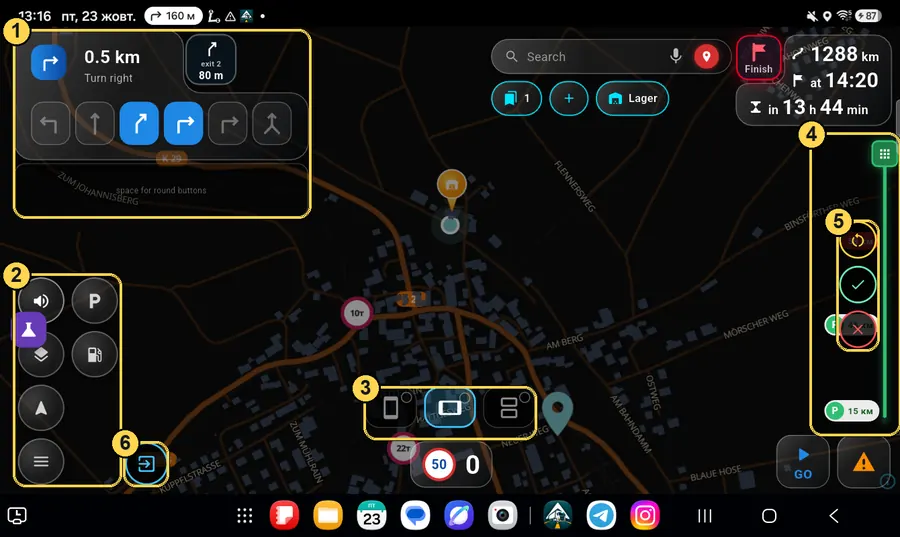
Landscape mode

A different layout

  1. 1Maneuver and the space for buttons — top left.
  2. 2Round buttons — in two columns.
  3. 3Mode squares: here landscape is lit.
  4. 4Route line — on the right, full height.
  5. 5Reset / ✓ / ✕ — in landscape they are on the route line.
  6. 6Leave the editor.
Editor in landscape mode
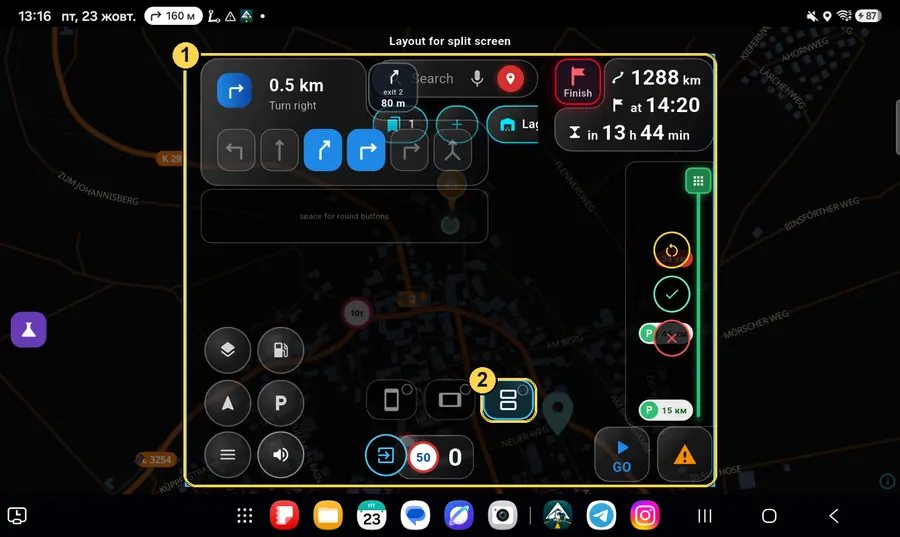
Landscape + split

Half screen, lying down

Same for landscape: frame (1) — size of the navigator on half the screen, square (2) — turn this layout on or off.

Split screen in landscape mode
Save

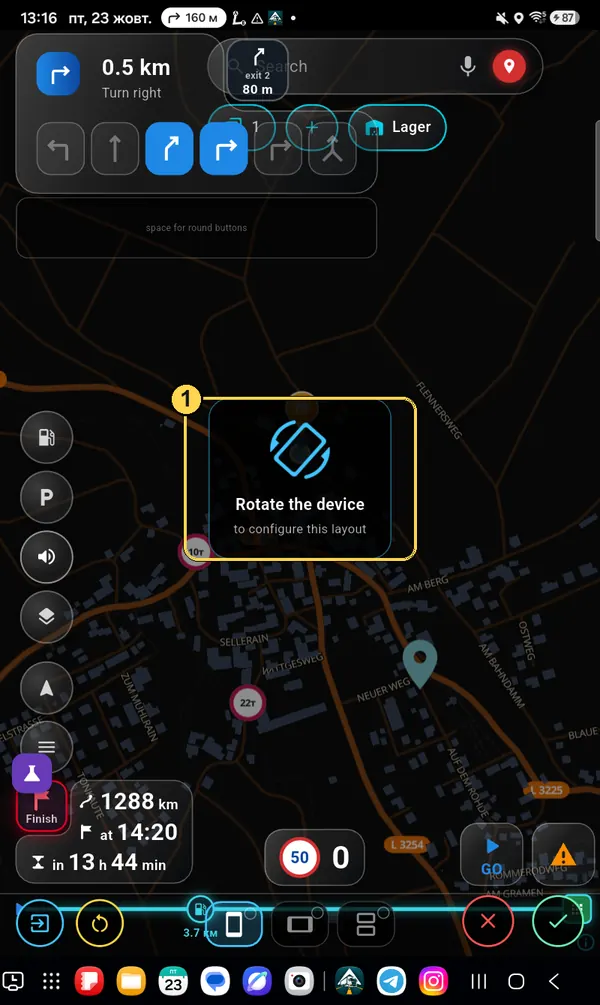
«Rotate the device»

Tap ✓. If the other mode is not set up yet, the app reminds you: «Rotate the device to configure this layout» (1). Turn the tablet or phone — the editor stays open; set it up there too and tap ✓ again.

Rotate the device hint
Something went wrong

Reset

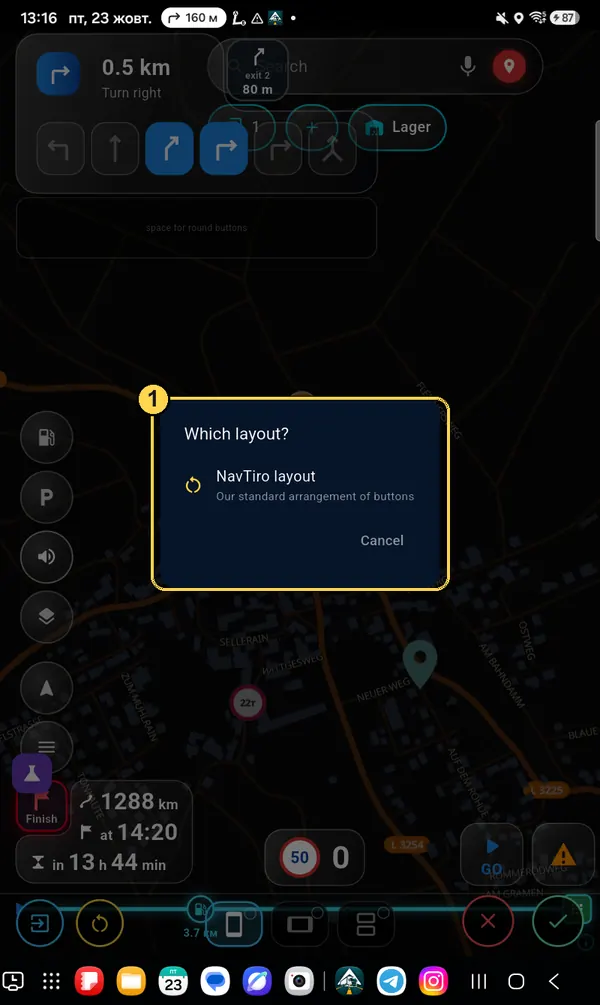
The yellow button with round arrows asks which layout to set (1): «NavTiro layout» — the standard one, or «Your layout» — your last save (it appears once you have saved something). Your layout is linked to your account: on a new device it comes back by itself.

Which layout? window